tutorial-assignment-beverlytan
Tutorial: Creating a Github repository
This project is maintained by EdDataScienceEES

Tutorial developed by Beverly Tan
Tutorial Aims:
This tutorial is an introduction to using Github to better organize your own work, and have better version control! The main learning objectives are as follows:
- How to create a Github repository to organize your project by using a versatile project folder structure
- How to interact with a Github repository in RStudio in executing a project: loading data, creating scripts and saving outputs
- How Github can be used for version control and tracking changes
Tutorial Structure:
We will start off with some introductory material on why version control is important and how you can use Git and Github to achieve this. We will then use a sample project and dataset to show you the features of Github. You can find additional resources on other features of Github such as: the issues tab, the projects tab, some information on markdown syntax, how to use Github for collaborative projects, as well as using Github via the command line!
1. Introduction to version control
2. Introduction to Git and Github
3. Set up your own project!
- (a) Create a repository and project folder structure
- (b) Using RStudio with Github
- (c) Adding materials into our repository
- (d) Working in R, saving intermediate and final products
4. Creating content pages
5. Conclusions and summary
6. Other tips, tricks and resources
1. Version control in Github
What is version control?
To start things off, let’s talk about what version control is. You’ve probably been doing version control with your own work without realising it: you have files such as soils_project_11_sept.R, soils_project_23_sept.R and you’ve likely been guilty of misusing the word “final”, labelling a file final_soils_project_27_sept.R, before realising that you have further edits, and then saving another file titled final_final_soils_project_30_sept.R.
Version control is basically a system that allows you to keep track of every modification to the file (in the above case the R script). This is so that if you make a mistake, you can “go back in time” and compare the difference between two files that you have made changes to and evaluate where the problem arose.
To illustrate this, we return to our earlier example: Let’s say you realise that the file final_final_soils_project_30_sept.R has some problems. With version control, you can go back compare the difference between final_final on 30 September to the final script of 27 September, and evaluate where the problem arose.
What is Git and Github?
Git is a version control software that allows you to track changes in computer files, and enables efficient collaborative working on those files among groups of people. Think of an amped-up “tracked changes” function on Microsoft Word, or the multiple versions you can see on a Google Document.
Github complements Git - it is a web-based hosting service that provides a home for those projects which you’re conducting version control with Git. It’s something like DropBox or Google Drive: you essentially use an online platform to create an online back-up of your projects.
If you’re working on personal, individual projects
Version control allows you to keep track of your work and helps you to easily explore the changes you have made, be it data, coding scripts, notes, etc. Each file on Github has a history, allowing you to explore changes that occur to any file in the project at any point in time.
Let me now show you an example of how Github allowed me to better manage my own project, specifically in tracking the changes I made to an R Script. In September 2018, when I was using RStudio for a project, I had not yet learnt how to use Github, and you can see my multiple R Scripts from the figure on the left below. These files are pretty much the same except for some minor edits, but I still wanted to save each script as a separate file because I didn’t know if I’d want to go back to that version. To be honest, looking back on that file structure now, I realise how much of a mess it is. I have no recollection of which script I ended up using in my final report!
This is in clear contrast to after I had learnt how to use Git and Github and used it for a project in November 2018 - the figure on the right shows an example of the history of the R script I was working on. Git tracks the evolution of the script, through a series of commits, each with its own explanatory message. More information on what commits are later in the tutorial, but for now just think of it as saving a change.
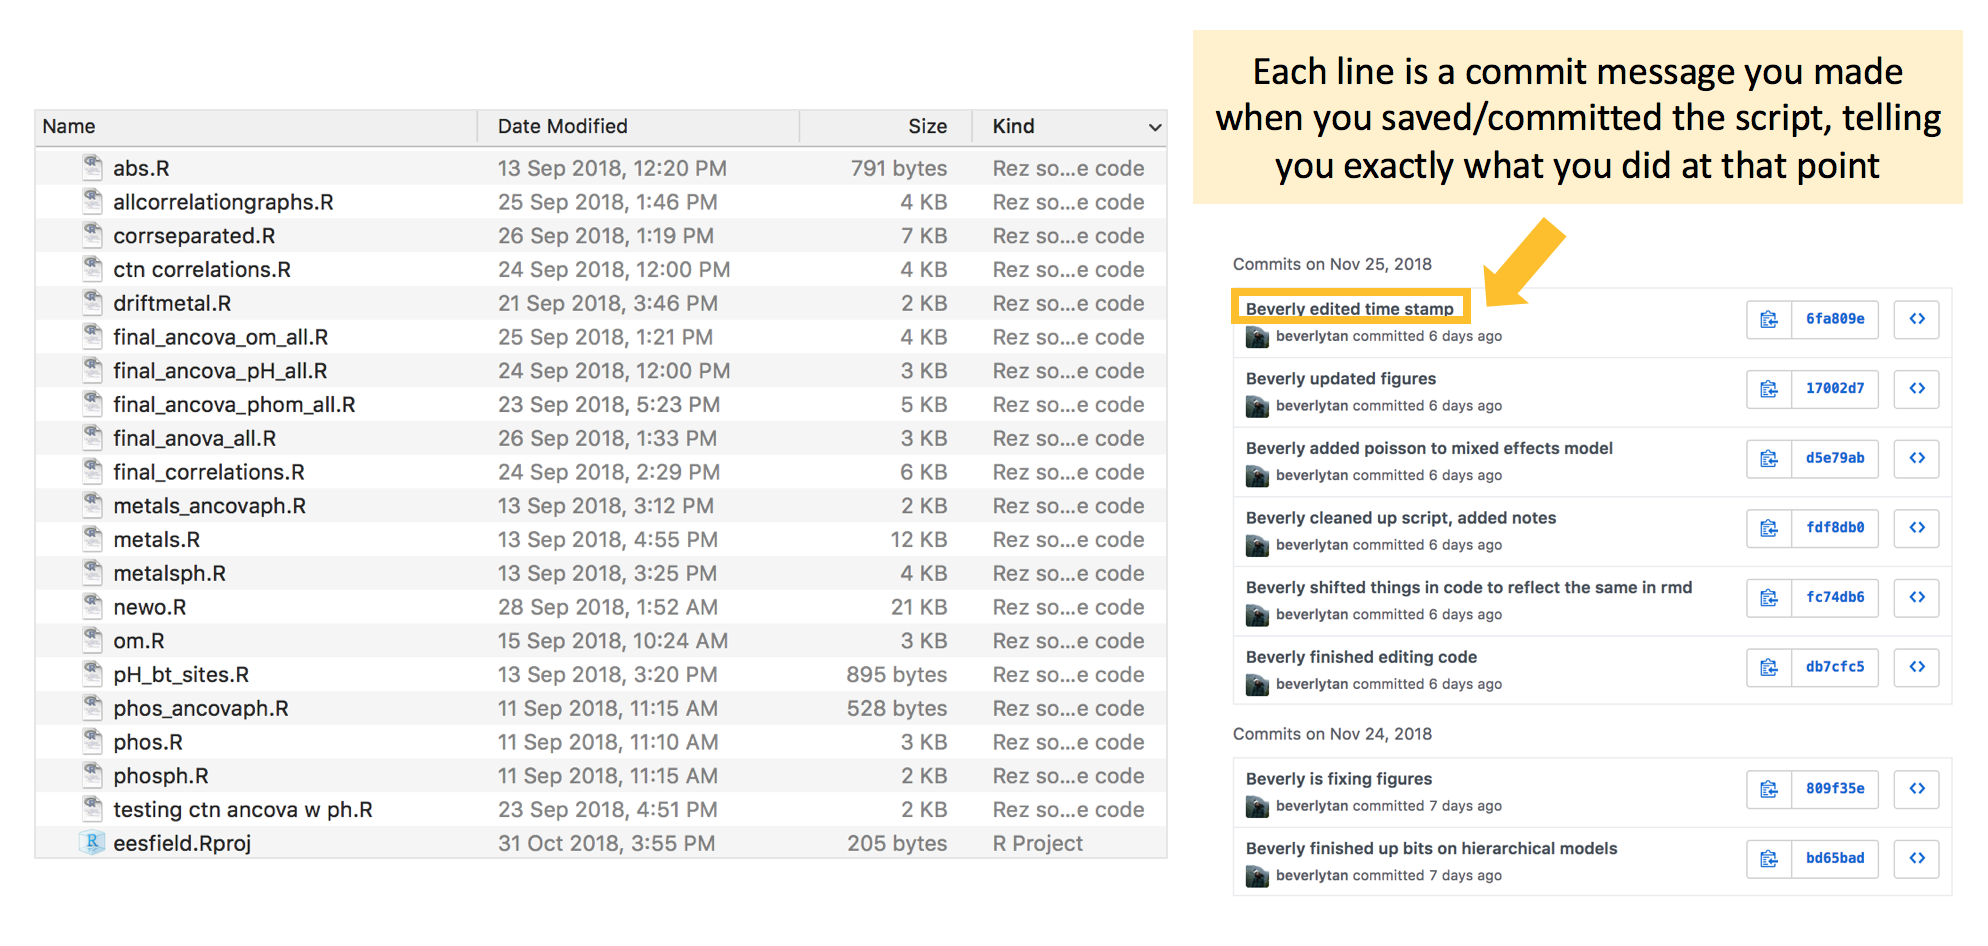
Github allows me to directly compare between the different versions of the code (or any file of interest) and exactly where changes were made. We’ll see how to do this and navigate between the many versions of the files we create, while only having one file in which we are working on.
Say hello to better version control and tracking of any changes!
If you’re working on collaborative projects
While learning how to use Github in collaborative projects is not the objective of the tutorial today (though there is a small segment about this at the end of the tutorial), you should be aware that version control via Github can also be very beneficial in collaborative projects. With Github, you can review other people’s work, add comments and suggest changes, and Github will indicate where each person has made changes in any file of the project. And again, with each file on Github having a history, you would be able to explore the changes that have occurred at any point in time.
2. Introduction to Git and Github
Create a Github account
First, register and create an account on the Github website.
If you don’t have Git installed on your computer, you will now have to install it.
Download Git: Windows
For Windows users, download and install Git for your operating system from this website. Below are some recommended installation instructions to follow to keep things simple:
| Prompt / option | Recommendations on what to select |
|---|---|
| Select components | Check the following: - Git Bash Here - Git GUI Here - Git LFS (Large File Support) - Associate .git* ... - Associate .sh ... |
| Select default editor | Either one of the following: - Nano (a simple terminal editor) - Notepad++ (a simple graphical editor) |
| Adjust your PATH environment | "Use Git from Git Bash only" |
| Choose HTTPS transport backend | "Use the OpenSSL library" |
| Configure the terminal emulator | "Checkout Windows-style, ..." |
| Configure extra options | "Use MinTTY ..." |
| Configure extra options | "Enable file system caching" |
| Credential manager | "Enable Git Credential Manager" |
Download Git: Mac
For Mac users, you first have to download Homebrew, which is a package manager for command line programs on a Mac. You then use Homebrew to download Git.
First, open a new Terminal window - which you can find in ~/Applications/Utilities/Terminal.app. You can also also search for Terminal with your Mac’s spotlight search function: Hit the command and spacebar keys, then type “Terminal”.
Copy and paste this line into Terminal and hit “Enter”, to download Homebrew.
/usr/bin/ruby -e "$(curl -fsSL https://raw.githubusercontent.com/Homebrew/install/master/install)"
Now, type this line into Terminal and hit “Enter”, to install Git via Homebrew.
brew install git
Follow any instructions that come up: you may need to enter your Mac’s password or agree to questions by typing “Yes” in the Terminal.
This might take a while, and you when it is complete, you should see a message like Bash completion has been installed to: .... You can also check if it has finished downloading by entering the following line in the Terminal.
git --version
If installation is complete, a message should return telling you which version of Git you have installed.
3. Setting up your own project
Now it’s your turn to set up a project! Let’s say we have a project that is investigating the difference in soil pH between two habitat types of grassland and forest, and we want to create a boxplot to visualize our results. In reality, we might want to go on to conduct statistical analyses, e.g. ANOVAs, but we’ll stop at the boxplots in this tutorial.
In this section, we will learn how to set up an appropriate folder structure for all the files that we will work with for this project. When you create your own repositories in the future, you can apply this file structure to all your other projects to keep yourself organized!
3a. Create a repository and project folder structure
Creating a repository
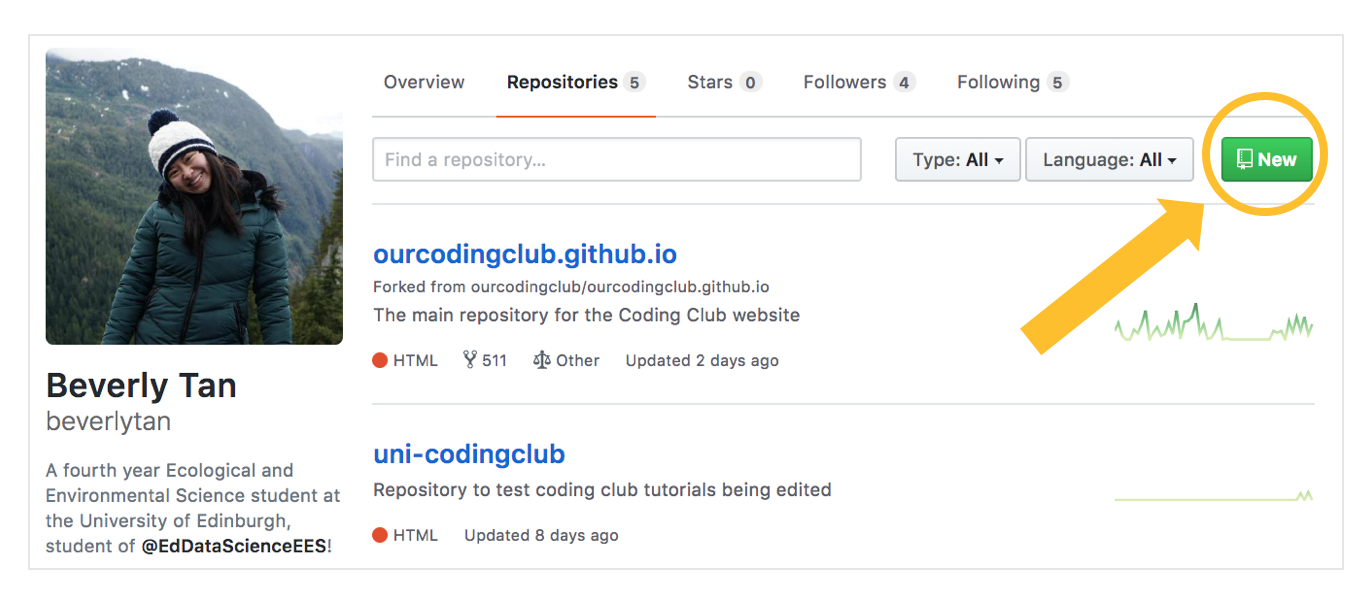
First, let us create a new repository by going to your profile and adding a new repository - think of it as your “main folder” that contains everything associated with a specific project. A repo can have subfolders within it, or be just made up of loose files.
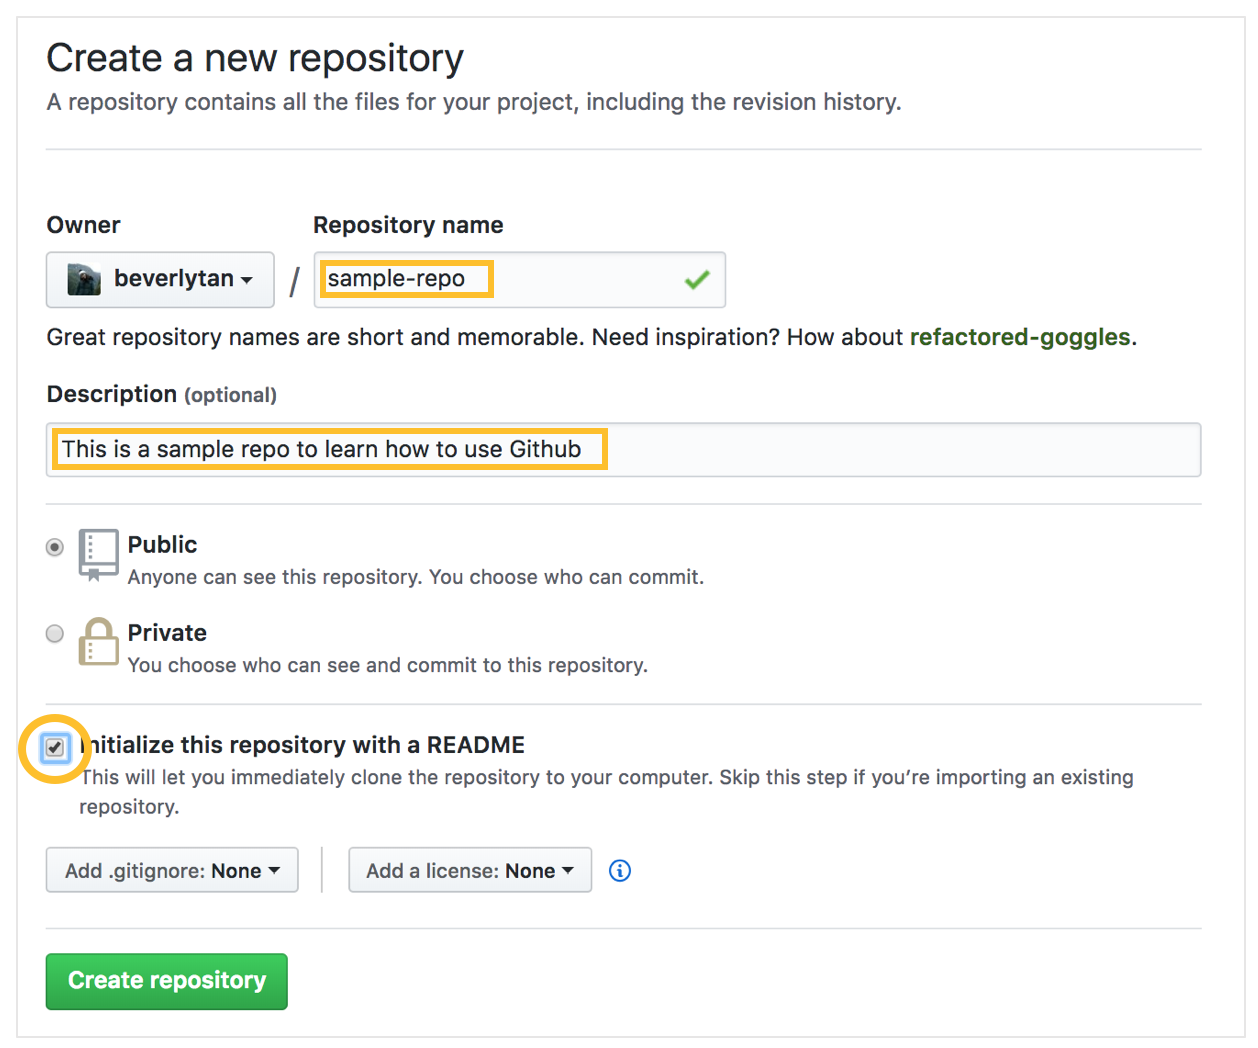
We then want to add some information about the repository - the name, and a brief description. For now, use “sample-repo” as the name of your repository. Just a note, when you name repositories / folders / files, some best practices include having everything in lowercase, no funky symbols and replacing spaces with hyphens or underscores. Consistently following these best practices minimizes the chances of errors popping up later on!
Also note that the repository that you create will be public - meaning that anyone (that finds you on Github) can see your files, suggest changes (that you would have to approve), or download your repository, but only the people that you add as collaborators to your repository will be able to edit, add or remove files directly. Github also offers private repositories that only you can see and access, and you can apply for a free one for educational purposes at this link.
Next, we want to initialise the repository with a README - that basically means when we set up our repository, we want it to have a Markdown file (think of it as a text file) called README.md. The README file acts as the “front page” of the folder that it is in, in this case the main repository. Note that every time you create a new folder, you will need to have a new README for each subfolder - you’re not able to create empty folders!
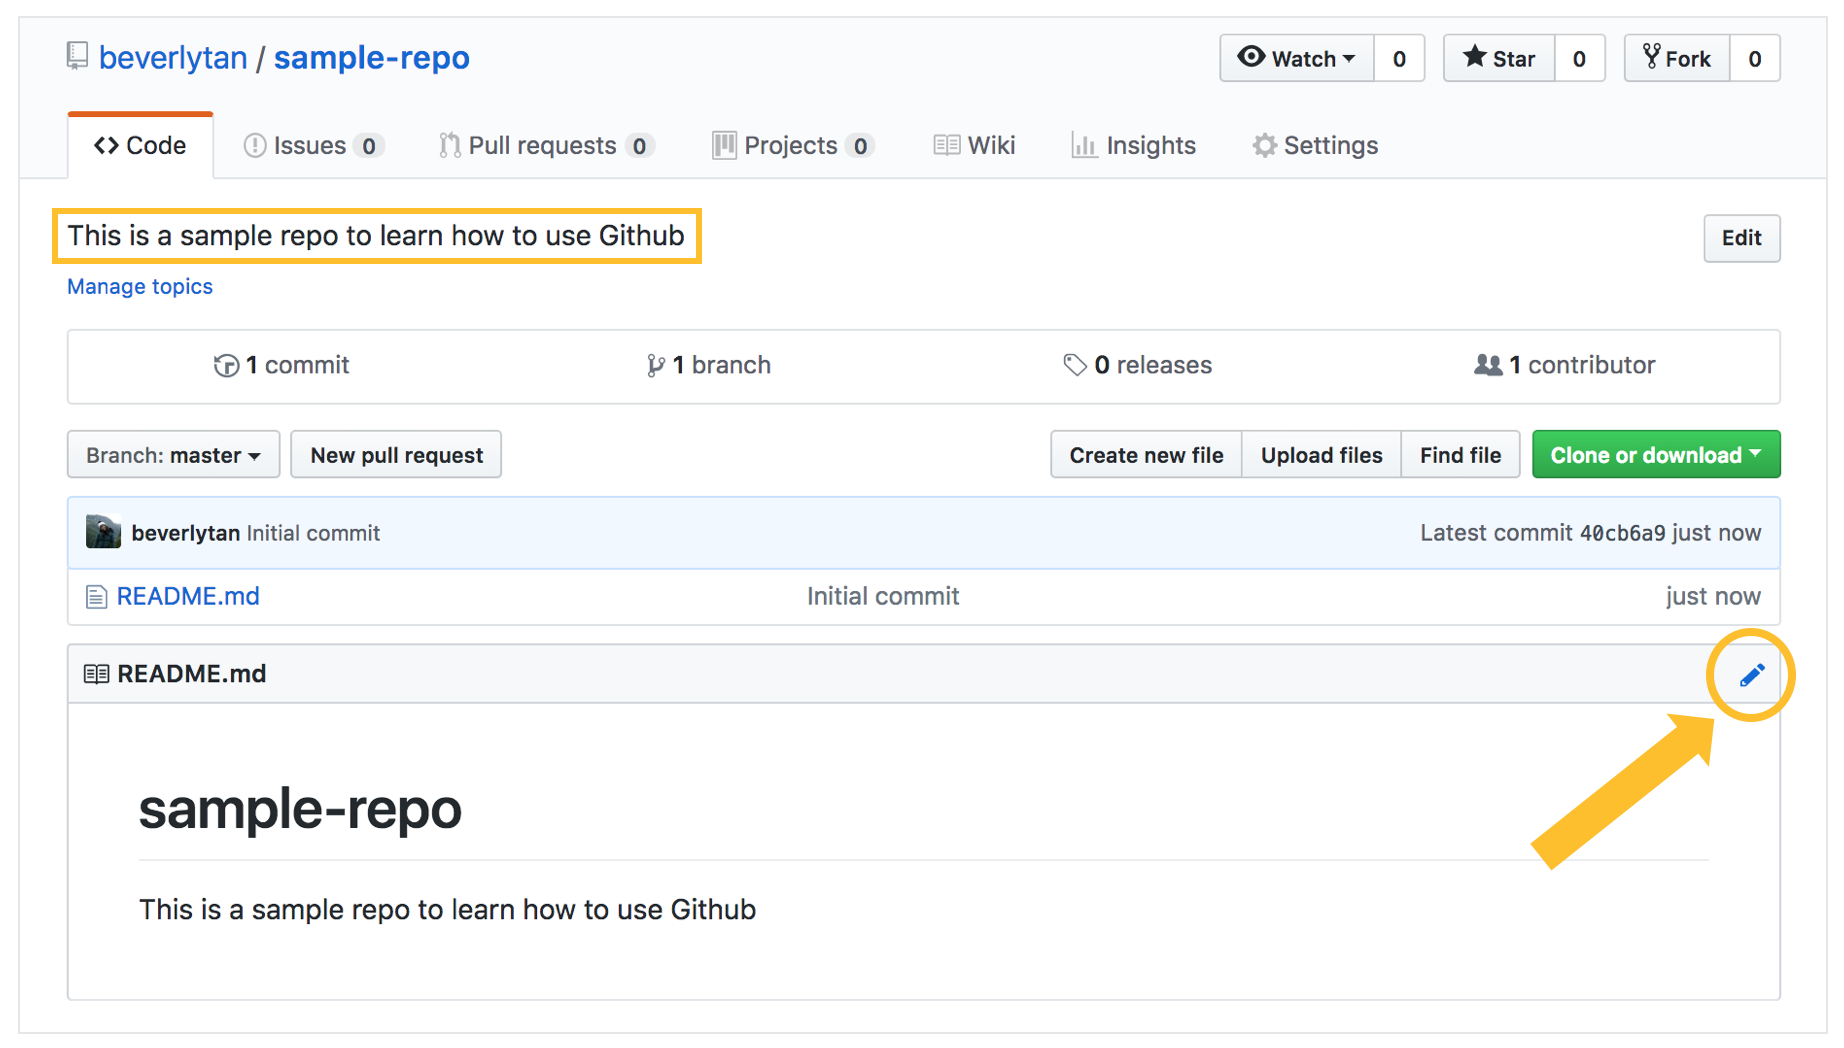
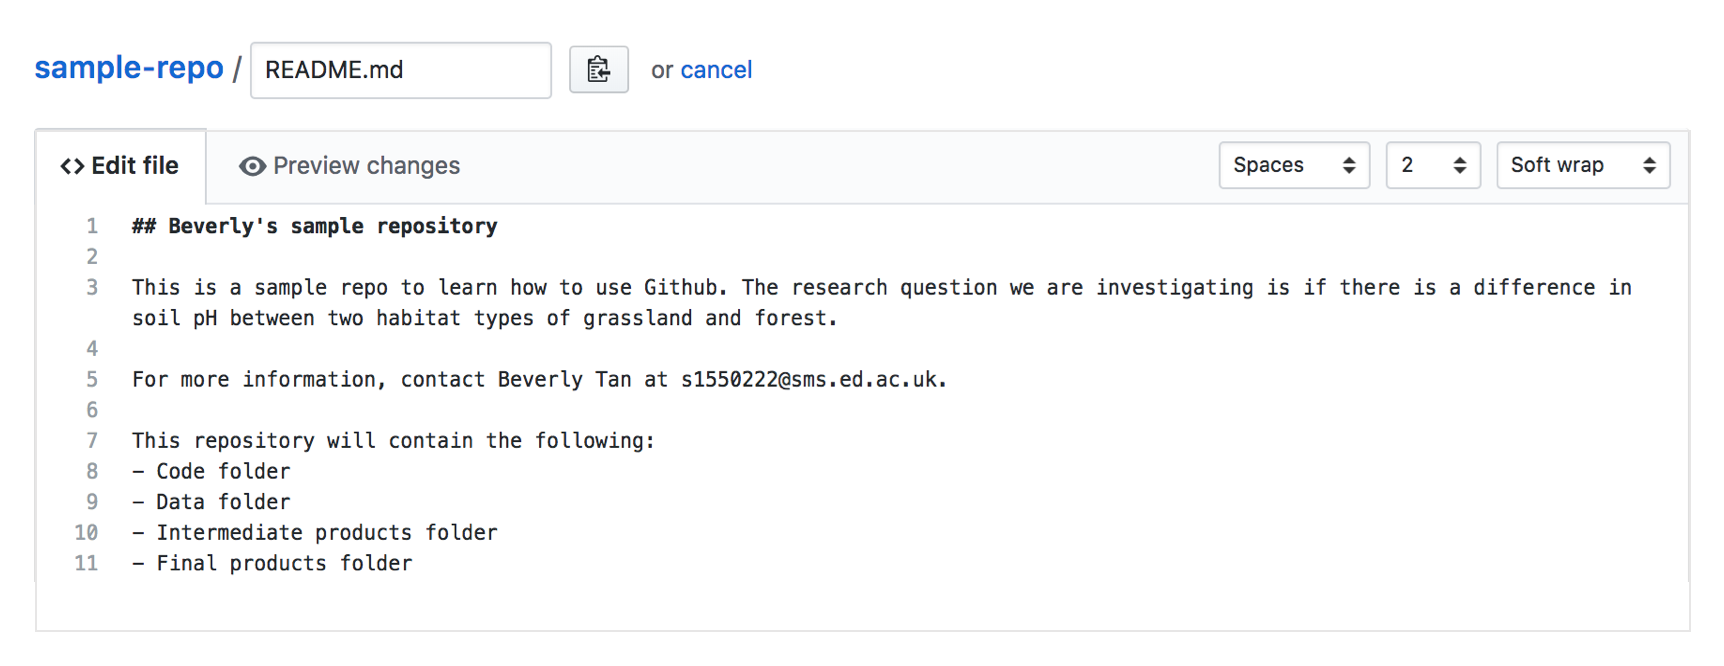
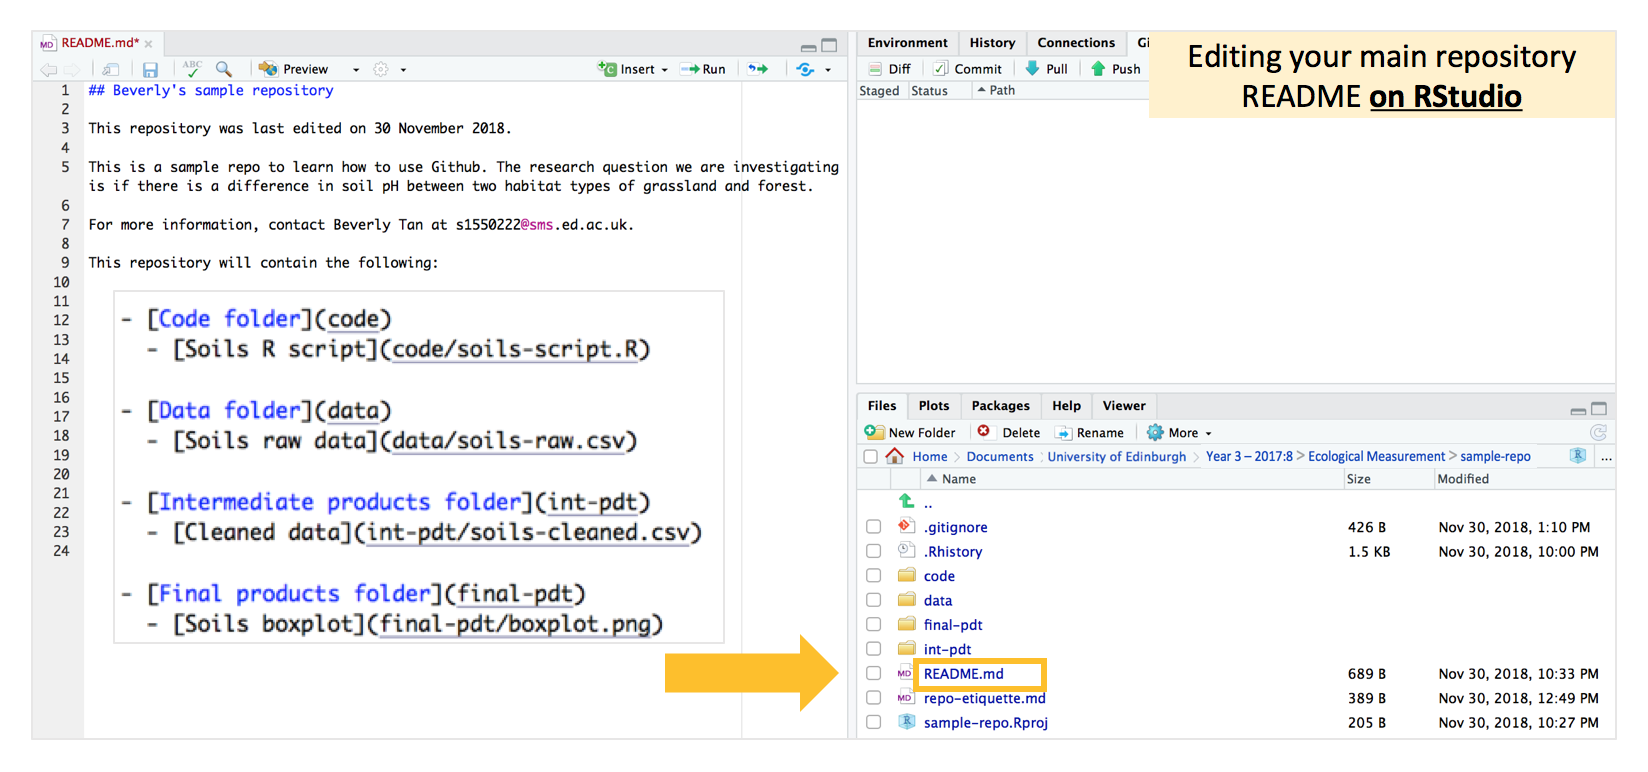
We now have a new repository titled “sample-repo”, and we now see that it is essentially empty except for that README file - which is our repository’s front page. Since it is the first page that someone would see when looking at your repository, it should include some key information such as what is contained within (a contents page), your name and your contact details! Click the pen symbol on the top right hand corner to open the editor.
We can now edit the README file! In the tab “Edit file”, you will see the plain text document where you can edit the file. You can use Markdown formatting here. For more information on Markdown formatting, refer to the additional notes at the end of this tutorial. For now, add the following text into your README file, to create a content page of the folders that we will have in our repository. Follow the folder structure I’ve set out here, with the following folders: Code, Data, Intermediate Products and Final Products, and type the text in the image below into your editor. Edit it such that it reflects your name and contact details.
I recommend this structure to organize any project, because it’s generic enough to be able to be applied across different projects, but still allows for clear project organisation! Refer to the BES Guide for Reproducible Code for more information on folder structure. We will be creating these folders in the next section.
As you’re editing, you can switch to the “Preview changes” tab to see how your formatting would look! The red colours show what material (text) was deleted, and the green shows what new material was added.

When you’re satisfied, note exactly what you have just done with an informative commit message. Here, our commit message should be “Beverly updated main repository README text”. Don’t have poor commit messages like “Edited text” or “Update README.md”, which is the default if you don’t type a message - you want to keep a good record of exactly what you are doing. This will be important if you want to go back to track your changes later.
Note that the standard convention is to have commit messages of less than 50 characters - if you exceed it Github will let you know with a warning message like in the image above. If you want to add more information, you should still start off with a simple message, and if really necessary, type more details into the “Optional extended description” box below.

Click the “Commit new file” button at the bottom of the page.
Developing folders within the repository
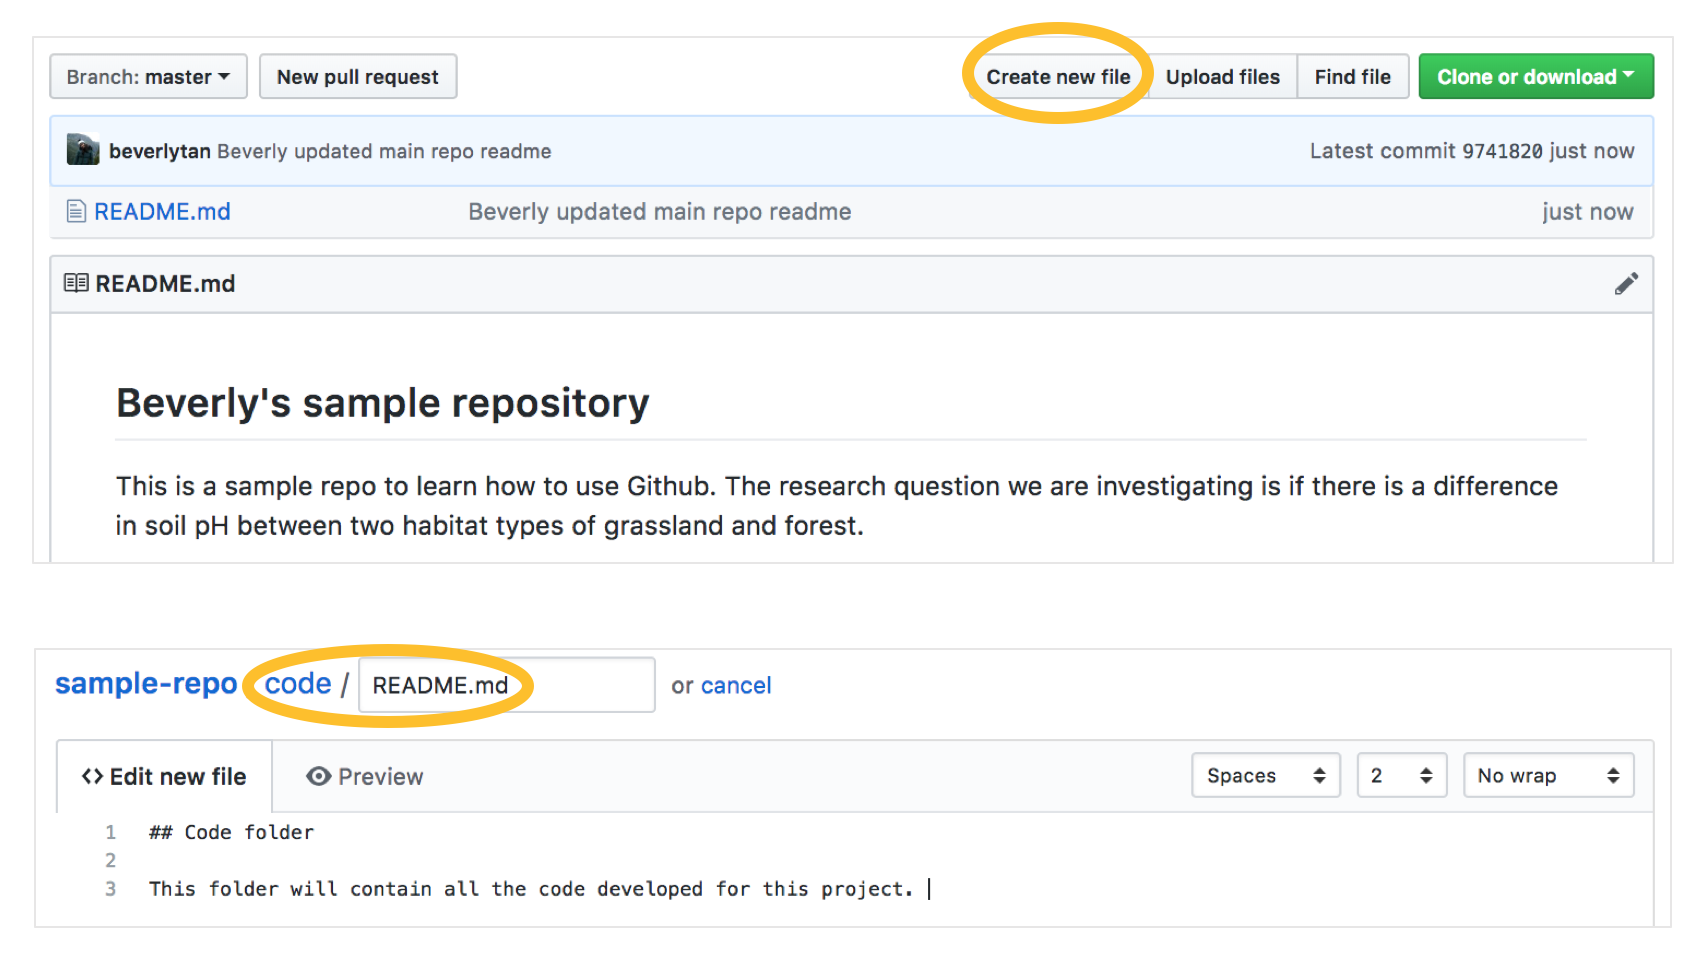
Earlier, we decided that a folder structure of Code, Data, Final Products and Intermediate Products will be used in this repository. We now have to create these folders in our main repository. Return to your main repository page by clicking “sample-repo” at the top of the page. Click “Create new file”, and a new editor page will come up.
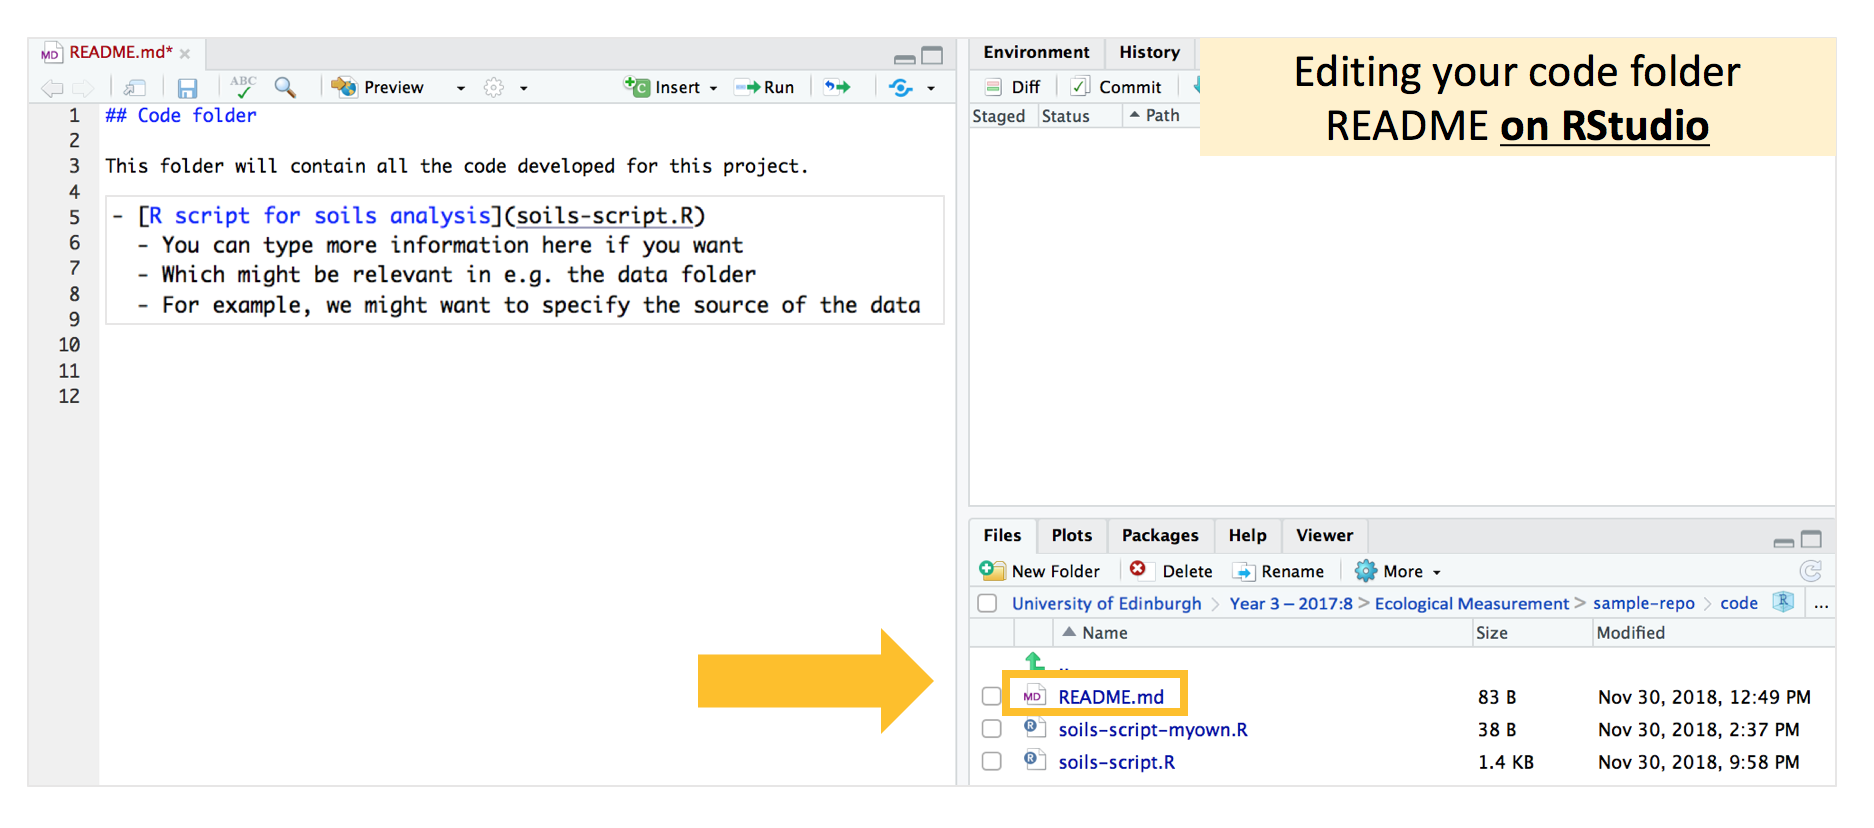
In the box that says “Name your file”, first type the name of your folder, in this case “code”, and type a slash “/” to signify the end of the folder name, and then type “README.md” to create a README file in the code folder (similar to how we clicked “Initialize repository with a README file).
Remember that we can’t make empty folders, so we will need to have to create a README.md file within the folder. In the “Edit new file” window, type some information about the folder, in this case just tell yourself that it is the Code folder, and what it will contain.
Tip: Using the # in a Markdown file will make the text a header, in this case I’ll be making the words “Code folder” a header. The more #’s you add, the smaller the font size will be, to signify a subheader.
Commit these changes with an informative commit message again, such as “Beverly added code folder”.
Now navigate back to the main repository page, and repeat the above process to create folders for Code, Data, Intermediate Products and Final Products. Note that if we didn’t navigate back to the main repository page, and you click Create new file > "examplefolder/README.md" while you’re in the Code folder, you would create that “examplefolder” folder within the Code folder. Remember that every time you create a new folder, you will need to have a new README for each subfolder - you’re not able to create empty folders!
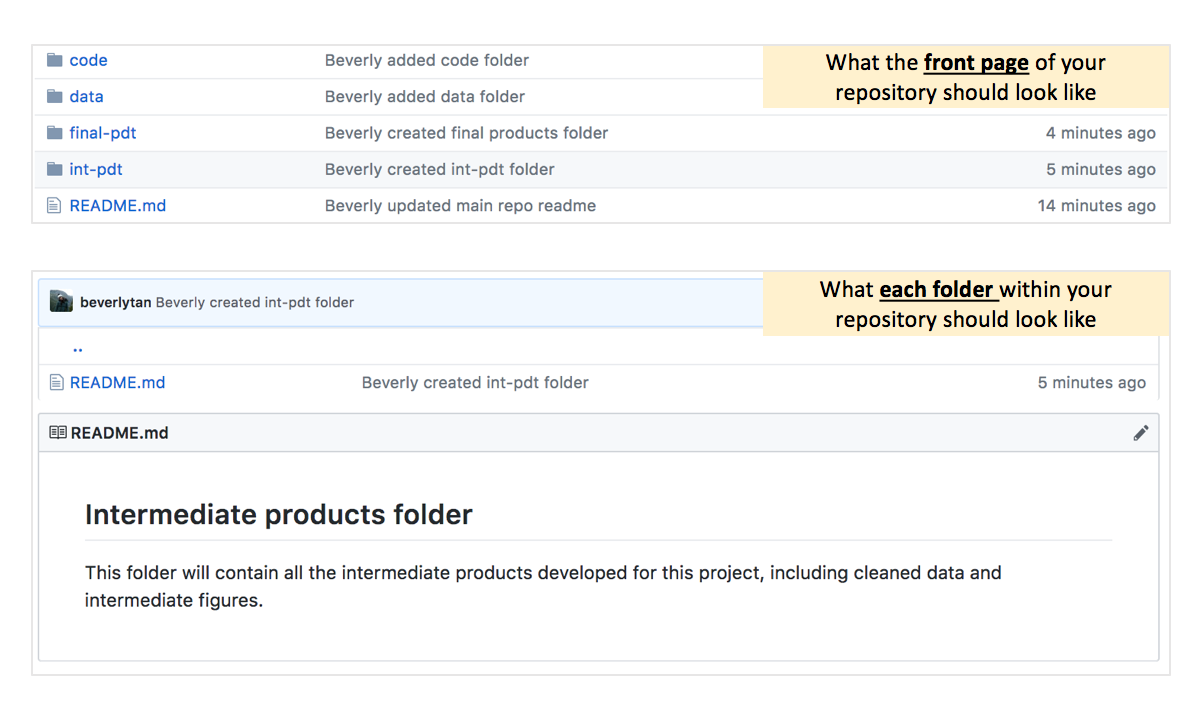
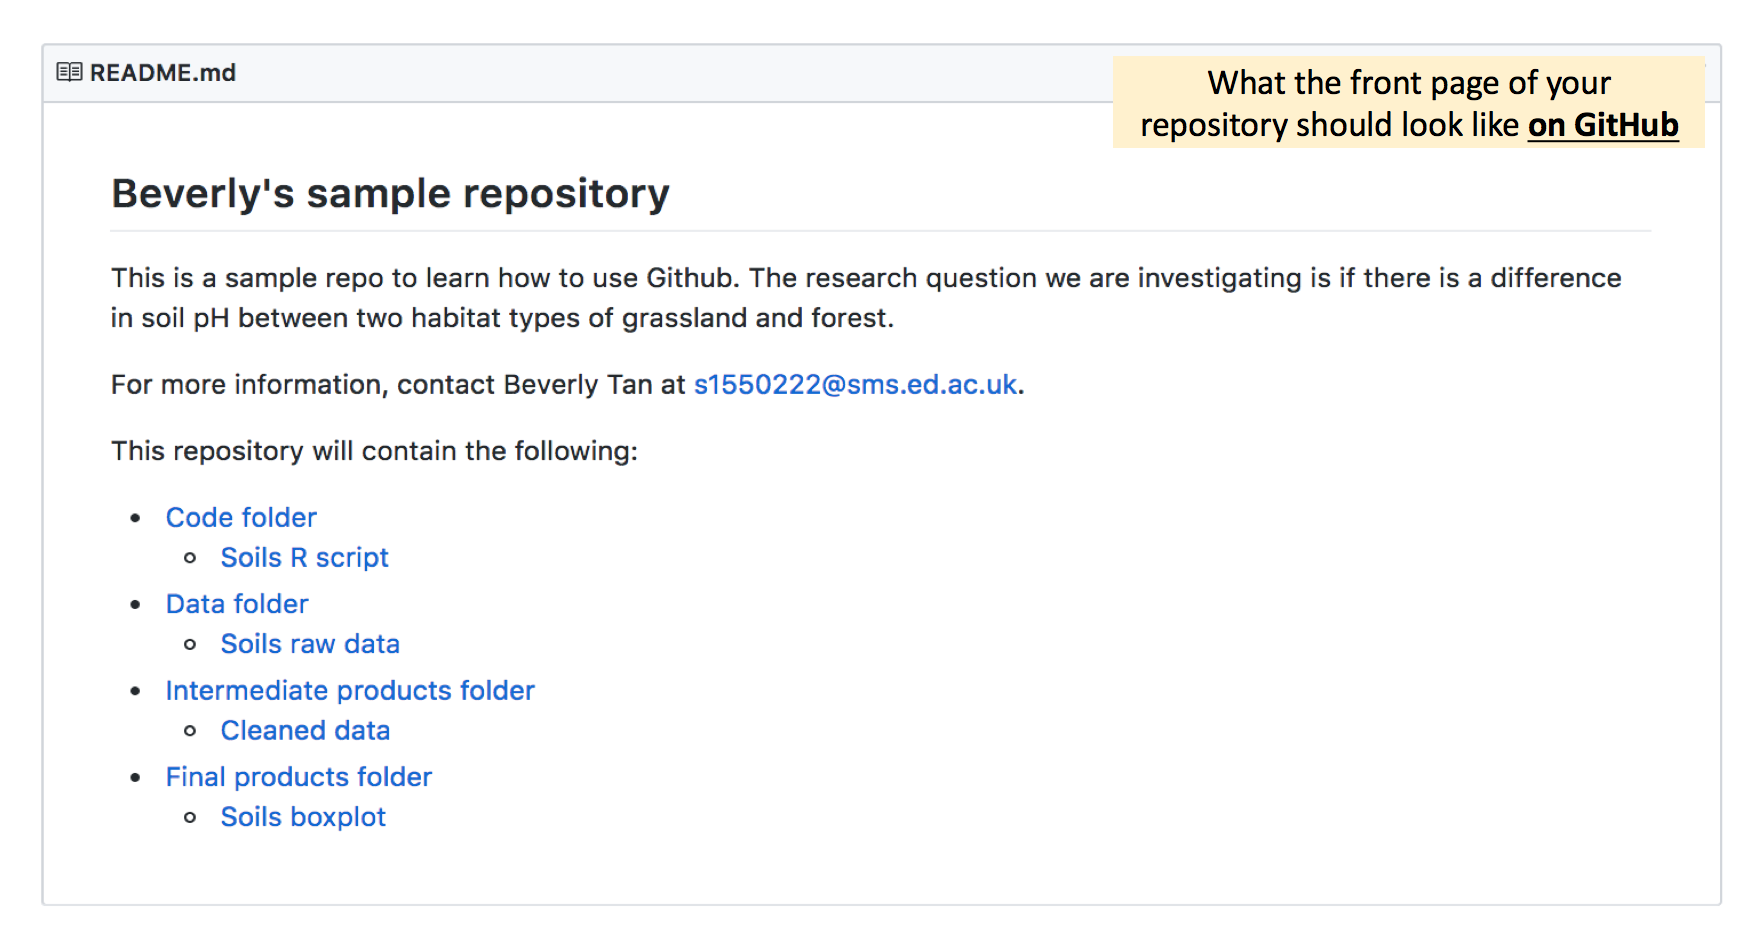
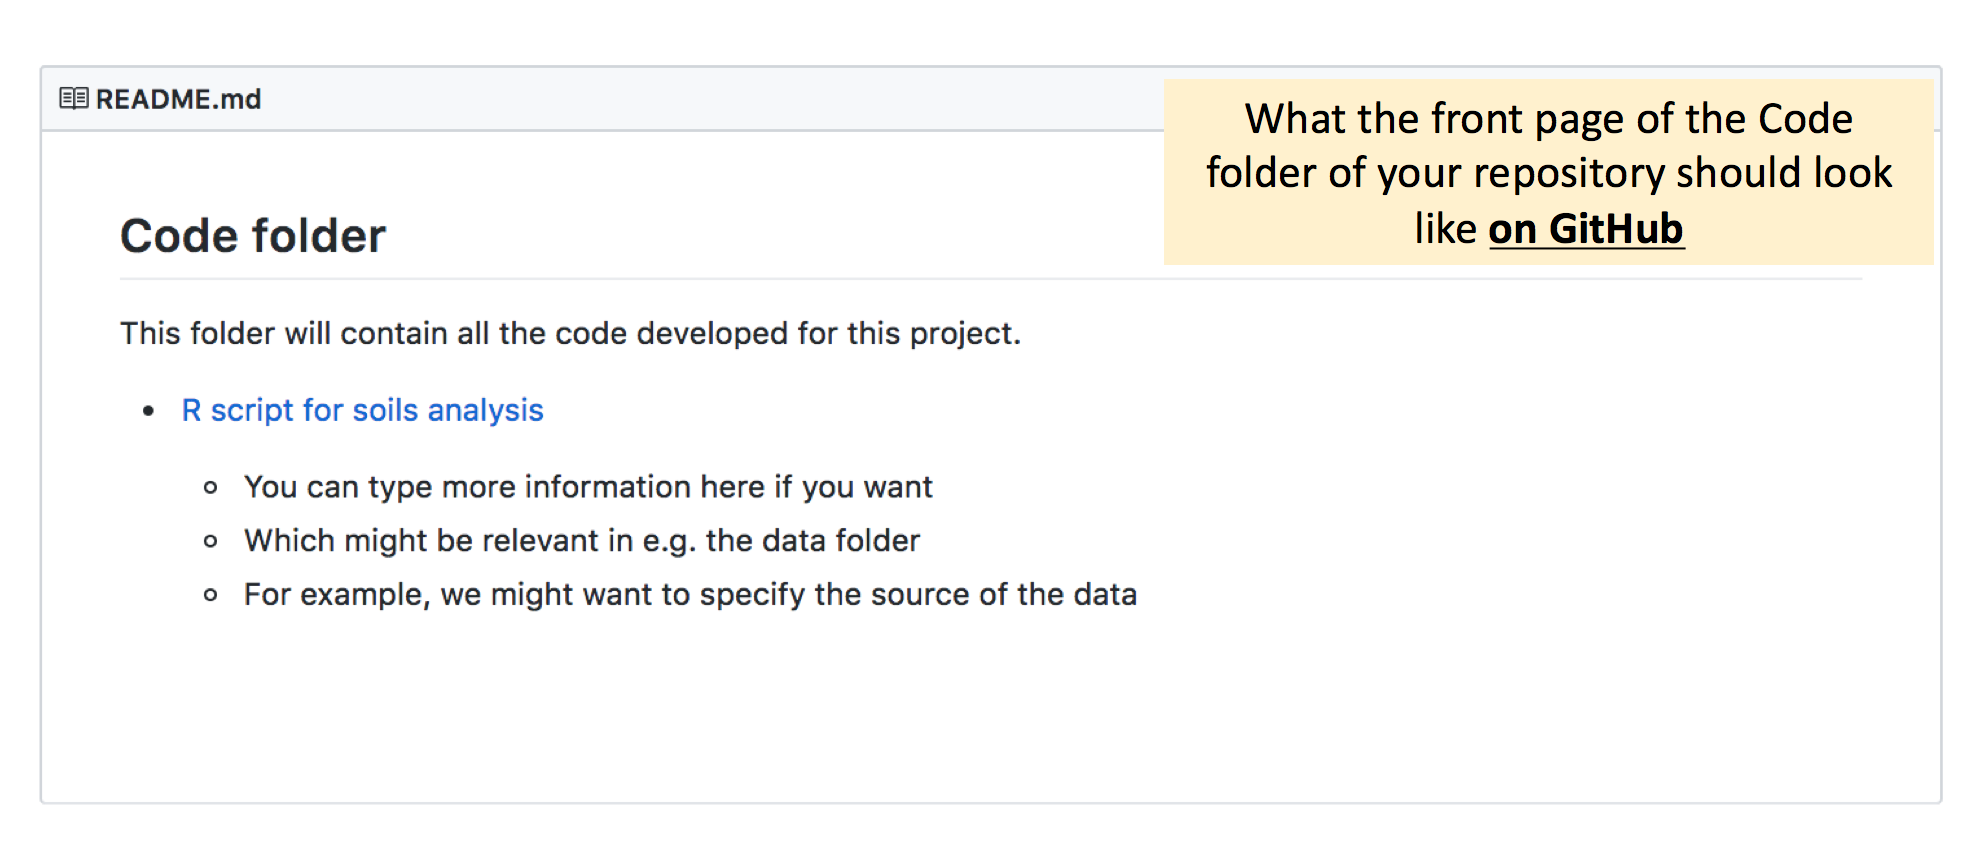
Your repository should now have the 4 folders and the main README.md file, and each folder should have a README.md within, telling you what the folder contains. Your repository and associated folders should look like this:
Perfect! You now have an organized repository with clear folder structure and you can now add material into your folders!
Adding a gitignore and repository etiquette file to our repository
Beyond the README files that have to be found in every folder, the two other files that we always have to add to the repository are a gitignore file and a repository etiquette file. You will just need to add these two files to the main repository, not in each folder.
gitignore file
A gitignore file is a configuration file that uses a series of rules to identify files that Git should not track. The files we want to exclude are generally hidden, temporary, machine generated files, such as: temporary Microsoft Doc / Excel / Powerpoint file and Mac users’ hidden .DS_Store files. In collaborative work, if you don’t create a gitignore file and specify these rules, someone who comes along and downloads your repository will download all these unnecessary files!
We add the gitignore file at the highest level of your repository. Making sure you’ve returned to the front page of your repository, click “Create new file” and then type .gitignore.

Now, copy the following gitignore template into the editor:
# User RProject files
.Rproj.user
*.Rproj

# User .RData and .Rhistory files
.RData
.Rhistory
.Rapp.history

# Temporary files
*~
~$*.doc*
~$*.xls*
*.xlk
~$*.ppt*

# Mac users' hidden .DS_Store files
*.DS_Store

# Users README files created by RStudio
*README.html
*README_cache/
*README_files/
You might be wondering why we don’t want Git to track our .Rproj file. We don’t need to, since we already track the changes of the R script itself - we can always create the objects and run the code in our R Project file again.
Commit your change with a message e.g. “Beverly added gitignore file”, and return to the main repository page.
Repository etiquette file
We now have to add in a repository etiquette file. This is especially important if you are adding collaborators to your repository. In projects that allow other people to edit the content of your repo, you want to tell them how you’d prefer for things to be done, and rules to follow.
To add a repository etiquette file in the main repository, click “Create new file”, and then type repo-etiquette.md. This would just be a Markdown file, and you can name it how you’d like, but “repo-etiquette” would work just fine.
Copy and paste the following example repository etiquette into the editor.
### Repository etiquette

- File paths to be kept short and sensible, use Github relative file paths instead of local computer file paths.
- Do not use capital letters, funky characters, symbols or spaces in file names
- Always pull before you push to avoid coding conflicts
- Commit messages
  - To be kept short and informative
  - Each message should revolve around one change or fix
Again, commit your change with “Beverly added repo etiquette file”.
3b. Using RStudio with Github
Linking our Github repository with RStudio
We now have a project repository on Github, with a folder structure ready for us to add our materials into! This repository on Github is known as your online / Github / remote repository. We also want to have this on our local computer so that we can work on it - this is known as your local repository. We do so by cloning the online repository and syncing a local repository to that via RStudio.
If you’ve never worked with RStudio before, check out this introductory tutorial to R and RStudio first.
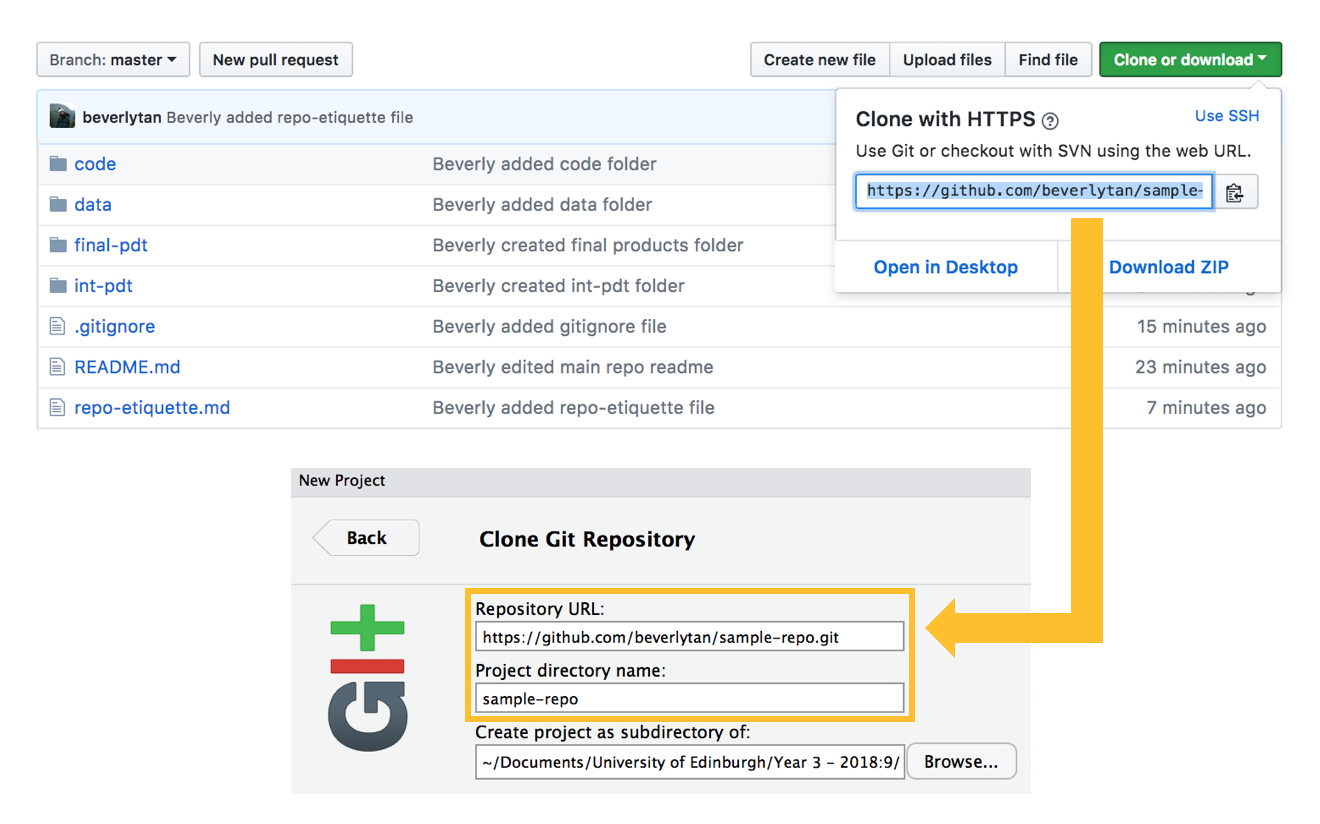
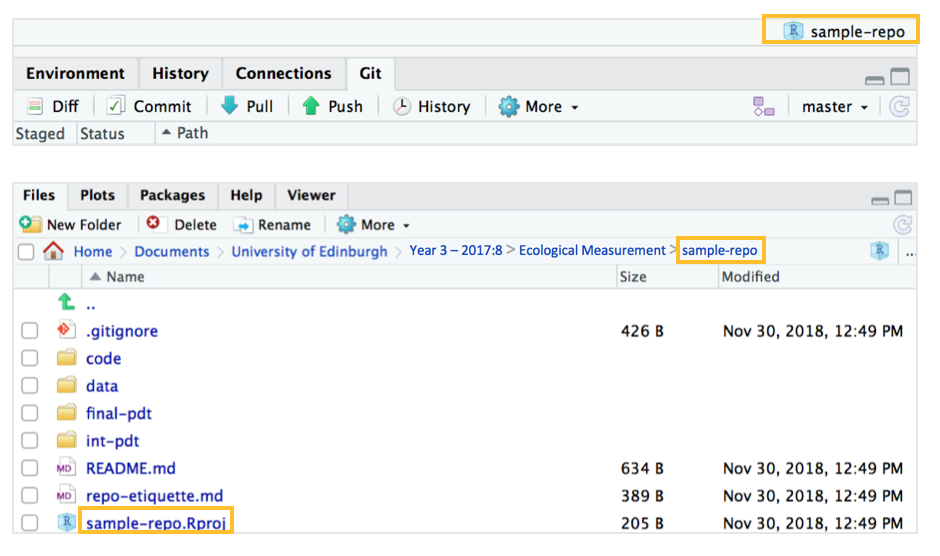
From our main repository page on Github, click the green “Clone or download” button, and copy the https URL that you see to your clipboard. Then open RStudio, go to File > New project > Version Control > Git, and paste the copied URL under repository URL. For consistency and optimal syncing between your local files and Github, make sure that your project directory name is the same as what you’ve named your repository to be. In our case, it should be “sample-repo”.
In deciding where you should create the project as a subdirectory of: let’s say this project was in fact for a Year 3 Course: Ecological Measurement. On my computer, I would have a “University of Edinburgh” folder in my Documents, and within that would have a “Year 3” folder, and within that folder finally have all my courses for Year 3, including a “Ecological Measurement” folder. I would therefore navigate to the “Ecological Measurement” folder, and set the project as a subdirectory of that folder. For now, you can just navigate to “Desktop” and create this repository there.
When you’re happy, click “Create project”, and you’ve just created a synced local repository! RStudio also automatically creates a .Rproj file for you in this local repository - but this is not reflected in our Github repository, because we’ve specified in our gitignore for this to not be synced to our online repo on Github. Your are also now working within this RProject - look at the top right hand corner of your RStudio window and you can see that it says “sample-repo”. There is now also a new “Git” tab!
Take a look at the “files” window at the bottom right - notice how our repository “sample-repo” sits in the correct “Ecological Measurement” folder, like it’s a folder within that on its own. We can also see the folder structure and the 4 main folders that we set up earlier.
If you navigate via your Finder window (or Windows Explorer) to your “Ecological Measurement” folder (or if you’ve set it to “Desktop”, to the desktop), you’ll be able to see the repository and its folder structure like how we’ve set it up to be online.
Commit-pull-push
So far, we’ve been introduced to a “commit” which seems to be similar to saving a file. But it’s much more than that, and it is best explained at this juncture, after we have synced our local repository and our online Github repository via RStudio.
Let me introduce the Github “commit-pull-push” workflow.
| The commit-pull-push workflow! | |
|---|---|
| Commit | When you make a change, you save the file with these new changes. After you save the file, you need to commit the change to your local repository. The changes are saved as a version of your repository, and are ready to go up onto your Github online repository. |
| Pull | Before you send your changes to Github, you need to pull, and grab any changes from the Github repository, and merge that into your local one. This is more important in collaborative work (refer to the last section at the end of the tutorial), but you might have made changes online that you forgot about, and its best to just make this a habit! |
| Push | When your local repository is up to date with the online Github repository, you can push your changes - so that your online repository is now updated with the changes that you've made. |
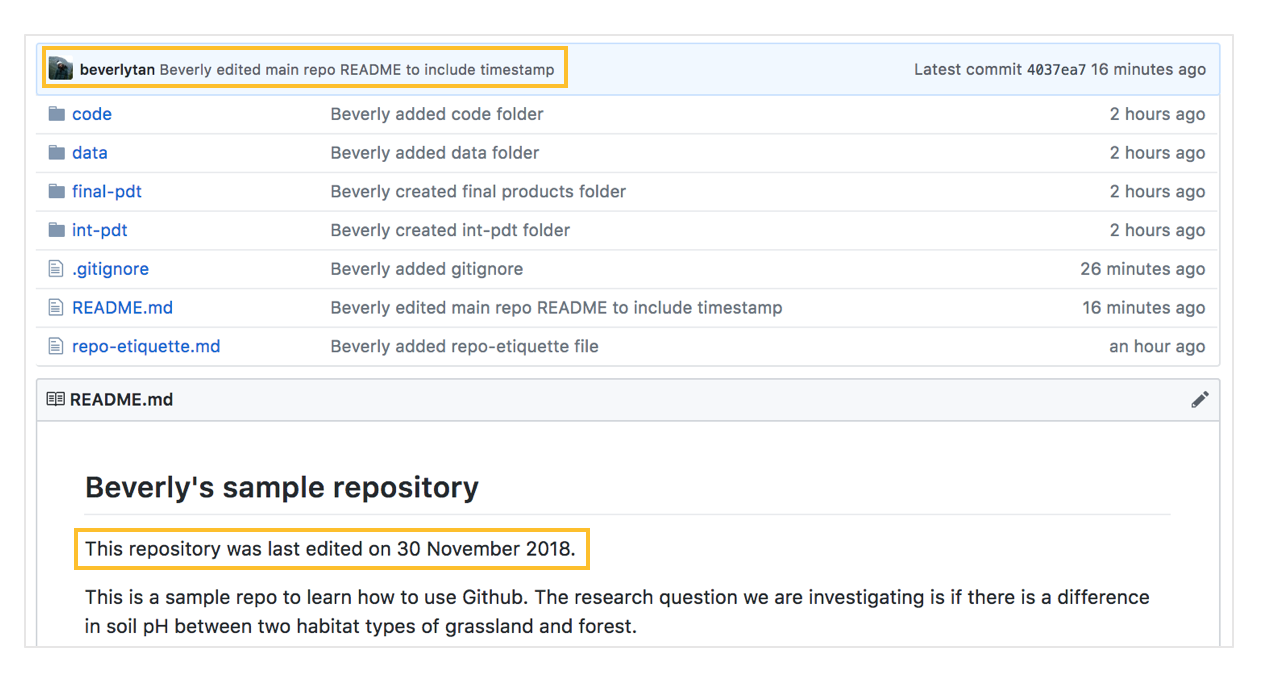
Let us test out how to use the commit-pull-push workflow to make some edits on our local computer, but have it synced to the repository we have on Github. For example, let’s say we wanted to add a timestamp to our main repository README telling us (or whoever looks at the repo) when the last edits were made. In the “Files” pane at the bottom right corner of your RStudio, open up your README.md file in your main repository, and type out a line saying the last time we edited the repository.
When you save that edited README.md file (with Control/Command - S on your keyboard, just like how you would save any other R script or file on your computer), it will now appear in the Git window. We now have to commit the changes - which mean save the changes on our local computer / repository. We start by checking the box under “Staged” in the Git pane, and press “commit”.
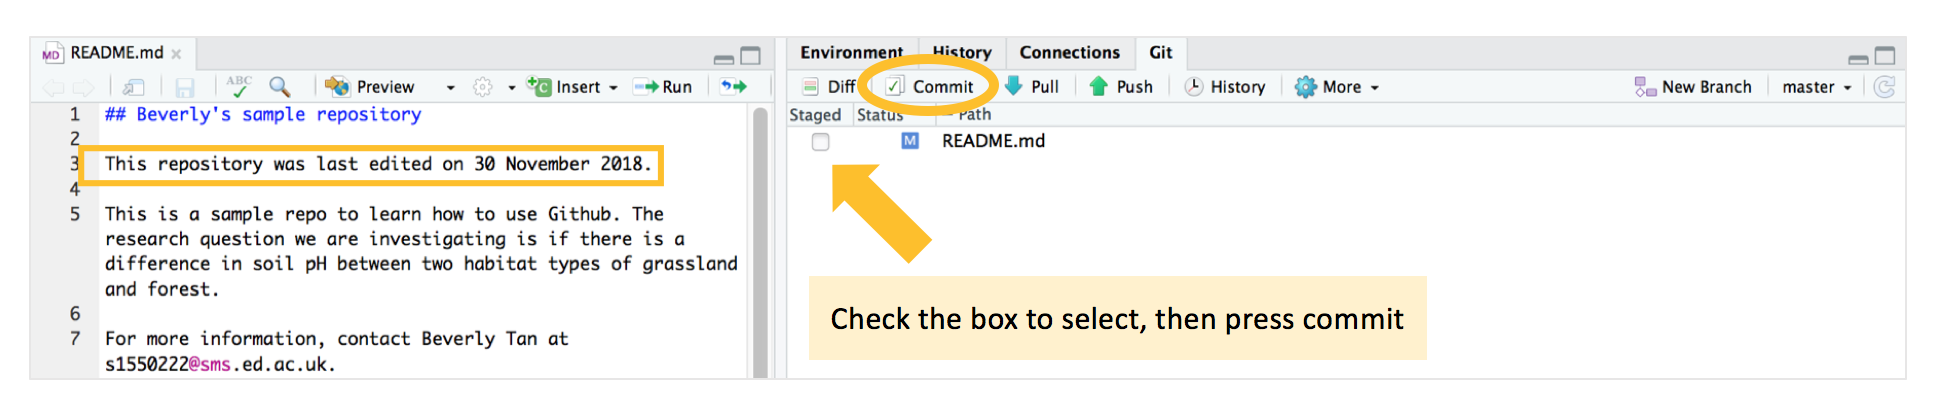
A new window opens up, and we type an informative commit message to go along with this commit: “Beverly edited main repo REDME to include timestamp”.
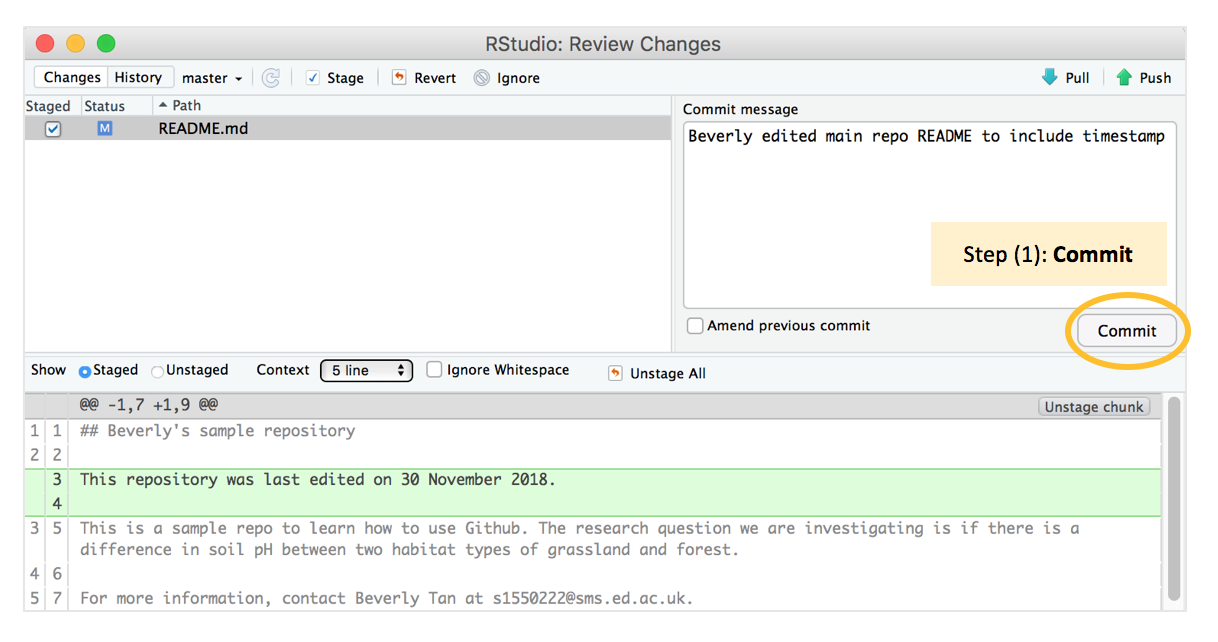
We then press “commit” again - this is Step 1 our commit-pull-push workflow. Good job, you’ve now made your first commit! :-) Note that every time we make a change to any file, and save it with Control/Command-S, the file will appear in the Git window and you will have to go through the commit-pull-push workflow.
If this is your first every commit, you might encounter an error message: Git tells you you need to configure your username and email. You can do so by clicking the blue gear cog symbol, and then clicking Shell. If this error message didn’t come up, you can just proceed.
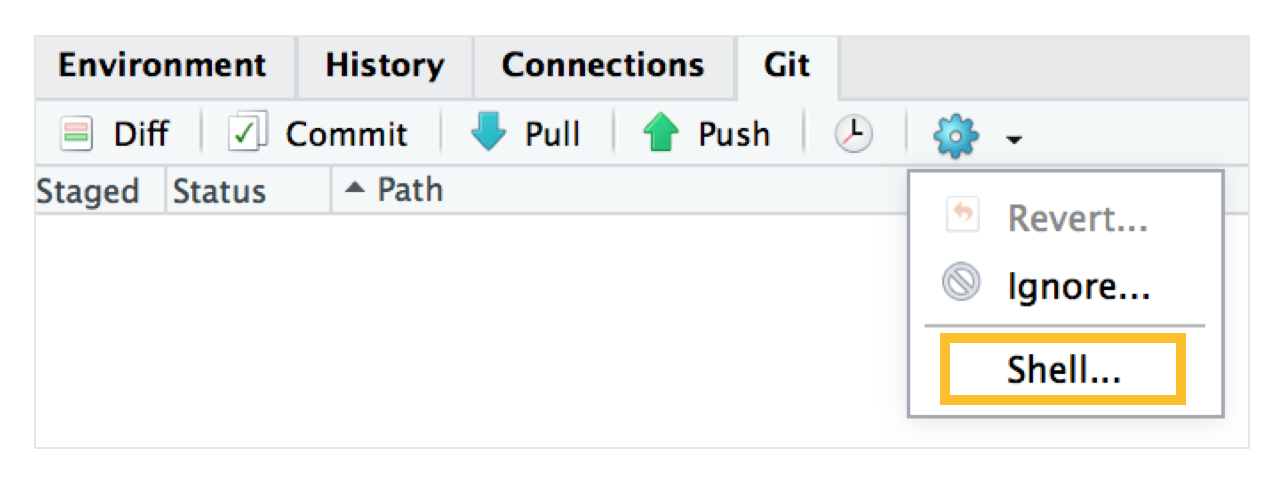
Type the following code to configure your username and email - you’ll only have to do it once. Then close the shell window, and try your commit again, and it should work fine!
# Replace example@example.com with your Github registered email, click Enter
git config --global user.email example@example.com

# Replace YourUsername with your Github username, click Enter
git config --global user.name "YourUsername"
After we hit commit, it tells us that “your branch is now one commit ahead of the origin/master branch” which means that your local repository is one commit ahead of the Github repository.

Step 2: We now have to “pull” from the online repository - in case there were any changes that we made on the online repository that we haven’t synced to our local one. Since we’re working on our own here, this isn’t that important, but it’s good to make it a habit! This is more critical when you have collaborators in your project, and they might also be working on the project and made changes. It should tell you that the repository is “Already up-to-date.” if both the online repository and the local one are synced.
Step 3: We then “push” our committed changes to the online repository, the message “master -> master” tells you that your changes have successfully been pushed, and what is online in your Github repository is now identical to your local repository.
Check this out by going to your online Github repository, making sure to refresh your page - you should now be able to see your commit message you typed earlier: “Beverly edited main repo README to include timestamp”, and your repository’s main README now has a timestamp:
You have now learnt the commit-pull-push mantra of version control, and how to do that in RStudio. Don’t worry if this seems unfamiliar - we’re going to do them many more times later in the tutorial, and you will be able to get the hang of it :-)
3c. Adding materials into our repository
Now, we can actually start work on the project itself! Remember that we wanted to investigate the difference in soil pH between two habitat types of grassland and forest, and we want to create a boxplot to visualize our results. We start off by adding our data into our repository.
The dataset used in this tutorial can be downloaded from this repository. Click on Clone or download > Download ZIP and unzip the folder. You can leave this in the Downloads for now.
Adding data into data folder
Now, use your Finder window (or Windows explorer) to move the “soils-raw.csv” from the Downloads folder into the “data” folder within “sample-repo”.
When you do so, if you go back to RStudio, you will realise that the “soils-raw.csv” dataset now appears in your “Git” window pane in RStudio - just as how our README.md file did when we made the timestamp edit.

Repeat the same steps: (1) commit the change with a message like “Beverly added data file”, (2) pull from our online repository and (3) push to Github. Our “soils-raw.csv” will be uploaded to the “data” folder in our Github repository!
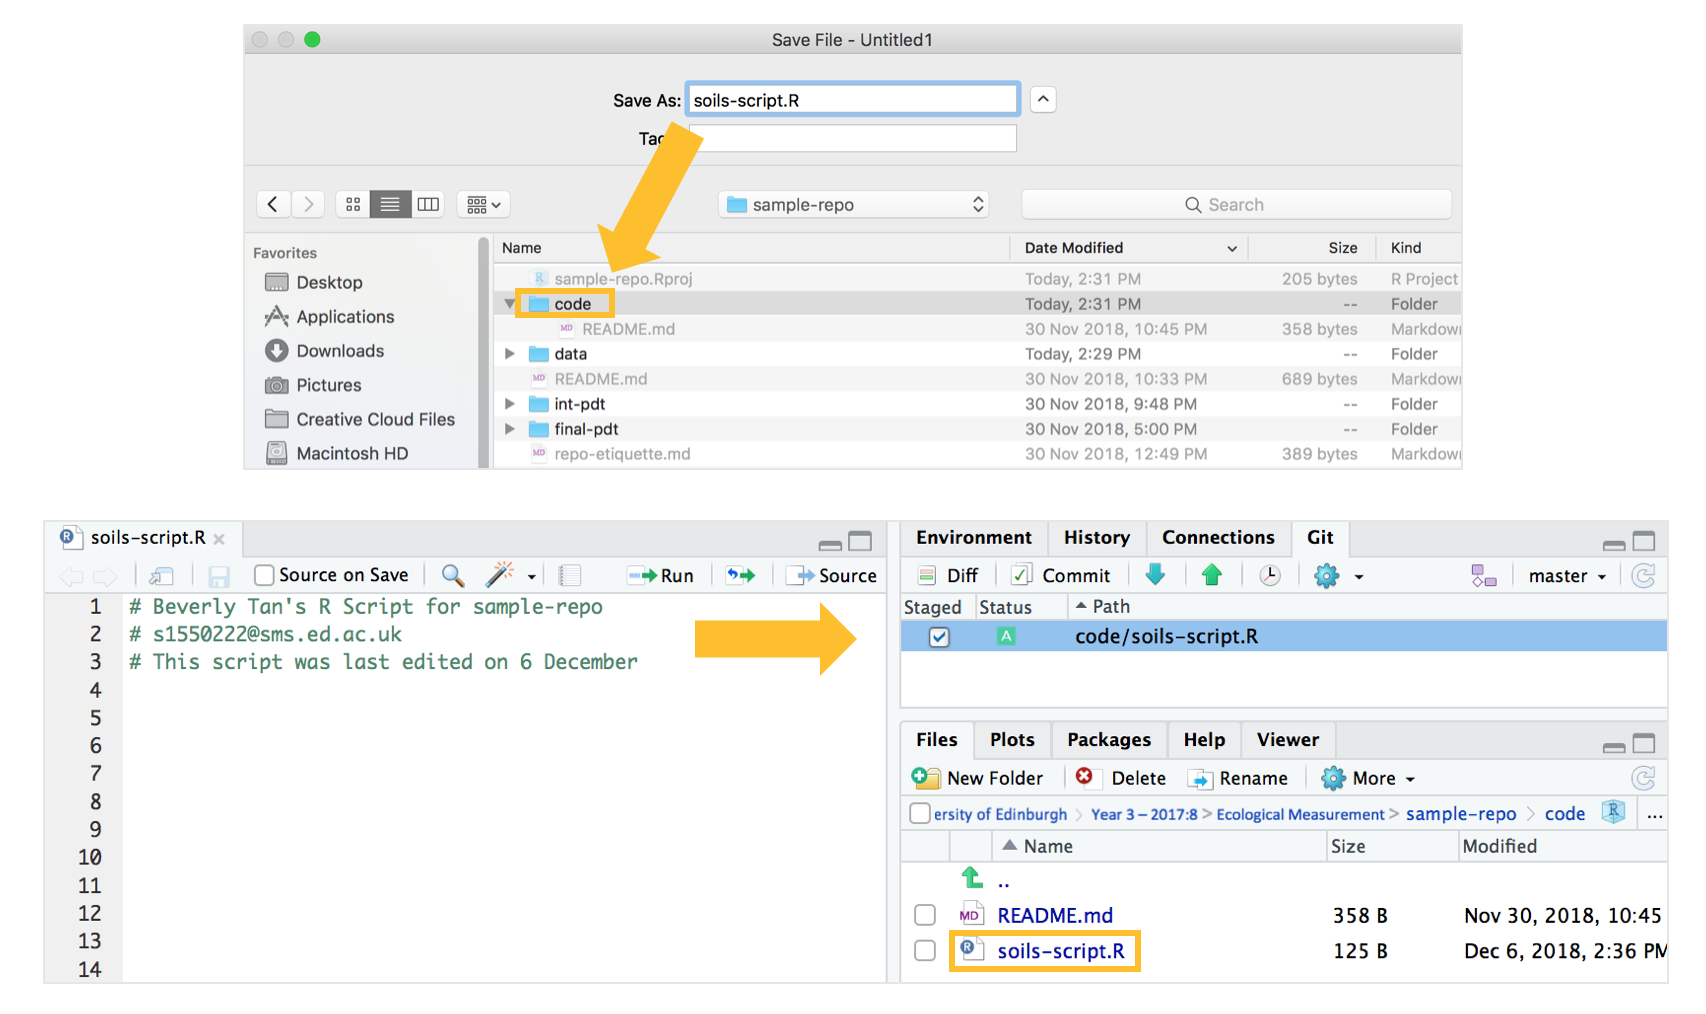
Creating R script in code folder
Now we’re going to open an R script to develop the code for the boxplot. In RStudio (you should still be in your “sample-repo” Rproj), navigate to File > New file > R Script, and name it soils-script.R.
Press Control/Command - S on your keyboard, navigate to your “sample-repo” repository > “code” folder, and save the R script there. Notice how it appears again in your Git window. Commit-pull-push your script, and the blank soils-script.R will be saved and pushed to our online repository.
3d. Working in R, saving intermediate and final products
We now have our R script open, data in the correct folder, and we’re ready to manipulate our data for analysis.
Loading data into RStudio environment
Copy the following code into your R script. If you save the script with Control/Command-S, it again pops into the “Git” window - you can commit-pull-push here if you want, or you can wait until we’ve developed the entire script since it’s a short one. It is however, good practice to intermittently save and commit-pull-push your files as you’re working away, just in case something goes wrong and your computer crashes!
# Your name: Beverly Tan
# Purpose of script: R Script for Github tutorial
# Investigating difference in soil pH between habitat types

# Load packages
library(readr)            # Required for loading data
library(dplyr)            # Required for manipulating data
library(ggplot2)          # Required for creating boxplot

# If you do not have these packages installed, install them with the following code:
# install.packages(ggplot2)
# install.packages(dplyr)
# install.packages(readr)

# Load raw data from "data" folder
soils_raw <- read_csv("data/soils-raw.csv")
Run each line of code to load our packages, and the data. A key thing to note about using Github with RStudio is that we don’t have to set our working directory manually. RStudio has already set the working directory to be wherever the Rproj file is located, which would be the main sample-repo folder (repository), found within our “Ecological Measurement (or Desktop)” folder. This means that when we load our data files, we have to tell RStudio where the file is located, with reference from our working directory.
Here, we’re telling RStudio that from the working directory (sample-repo folder), we have to enter the data folder, and from the data folder, access the file soils-raw.csv. The / slashes are how we indicate that we are entering the next level.
Saving intermediate products
We now have our data loaded, and we can proceed to clean and extract what is needed for analysis.
Earlier in the tutorial, we created a folder called “Intermediate products”. This folder is meant to contain material that is still important, but not the final products. For example, it could include diagnostic plots of linear models which we might want to save, but is not the final product.
Another example of an intermediate product is a processed dataset. In this tutorial, the “soils-raw.csv” raw data file that I’ve given you has some unnecessary metadata that we don’t need in our analysis. We will therefore use data manipulation tools in R to extract only the relevant information and create a new dataframe, and then save that processed “clean” dataframe into our intermediate product folder! While this might seem unnecessary in this example, you can imagine that this would be quite important if we’re working with large datasets.
In addition, a good coding practice is to leave the raw dataset untouched in the code folder and conduct all the tidying of data in the R Script. After tidying up the data, we then save it separately as an intermediate, cleaned dataset. This allows us to develop a reproducible workflow. Someone else looking at your repository can simply load this cleaned dataset and use it directly for analysis, but can also check out the raw data, or see how you obtained this clean dataset from the original one!
Let’s get to it. We first run the code to clean the data and obtain the information we need for analysis. For more information on efficient data manipulation, check out this coding club tutorial. Copy and run the following code in your R Script:
# Cleaning data and obtaining necessary information
soils <- soils_raw %>%
  select(site_num, sample_num, habitat, soil_pH) %>%
  group_by(site_num, habitat) %>%
  summarise(average = mean(soil_pH))
We then save the dataframe soils as a csv file titled “soils-cleaned.csv” in our “intermediate products” folder using write.csv. Again, we have to direct the location of where the file should be saved, from the working directory into the “int-pdt” folder, with the use of “/” slashes. Copy and run the following code in your R Script.
# Saving cleaned dataframe as a csv file
write.csv(soils, file = "int-pdt/soils-cleaned.csv")
After we run this piece of code, you will notice that the “soils-cleaned.csv” csv file will now appear on our Git pane, as well as in the “int-pdt” folder (you can see this from the RStudio “File” window at the bottom left).
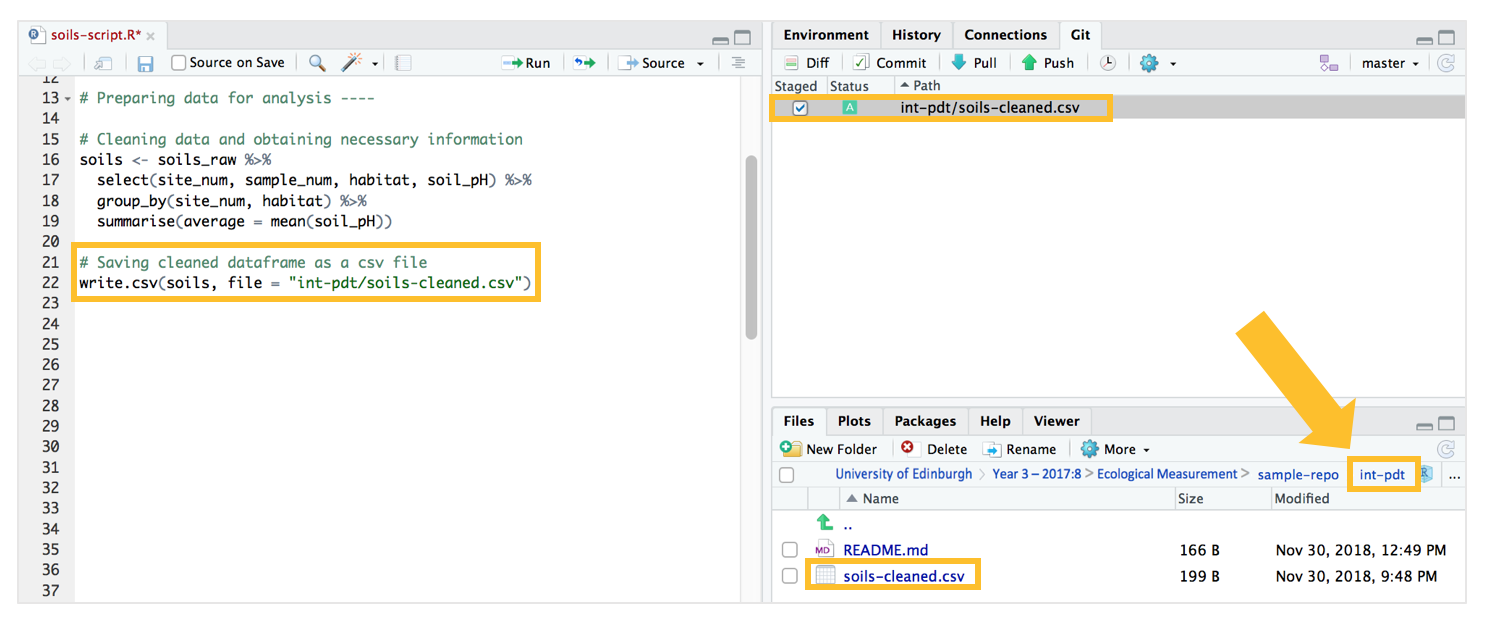
Select the “soils-cleaned.csv” file in the Git window pane, and then commit-pull-push! Remember to commit this change with an informative message.
Saving final products
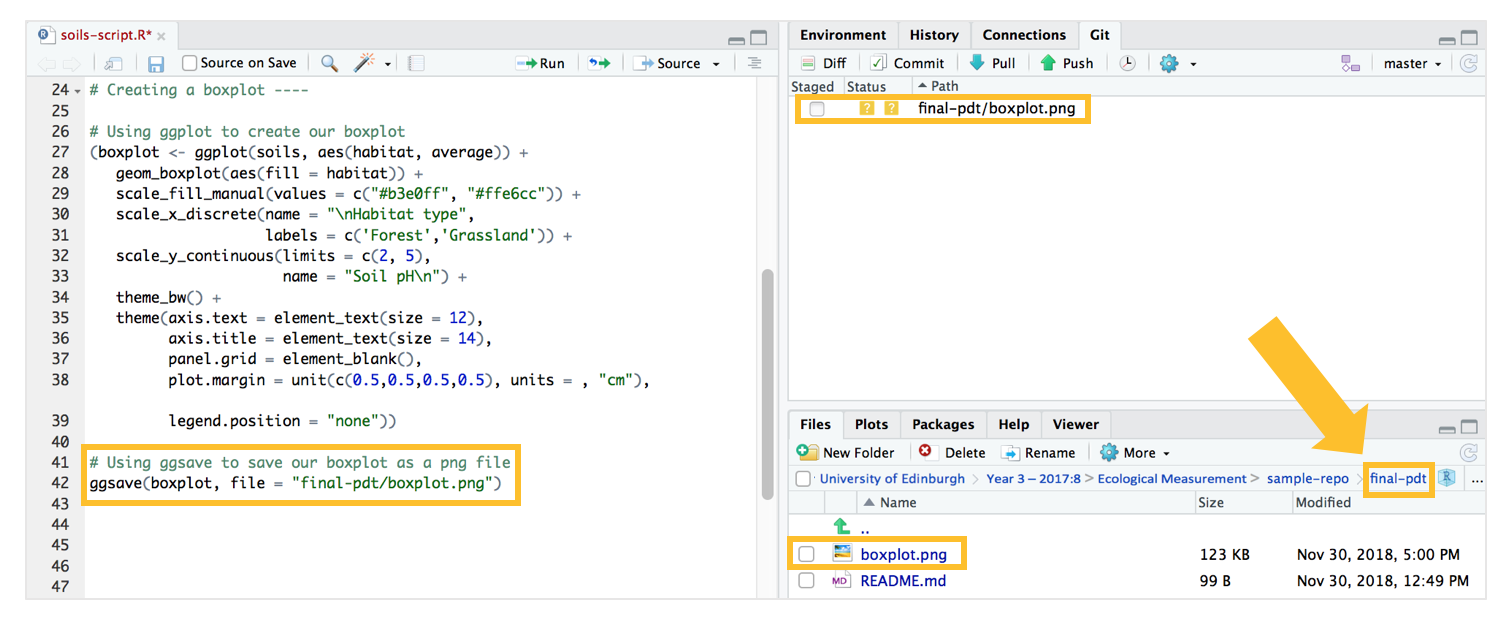
We now want to create our boxplot, and we can do so with ggplot. For more information on using ggplot for data visualization, check out Coding Club’s introduction to ggplot here, and a follow up tutorial here. Copy and run the following code in your R Script:
# Using ggplot to create our boxplot
(boxplot <- ggplot(soils, aes(habitat, average)) +
   geom_boxplot(aes(fill = habitat)) +
   scale_fill_manual(values = c("#b3e0ff", "#ffe6cc")) +
   scale_x_discrete(name = "\nHabitat type",
                    labels = c('Forest','Grassland')) +
   scale_y_continuous(limits = c(2, 5),
                      name = "Soil pH\n") +
   theme_bw() +
   theme(axis.text = element_text(size = 12),
         axis.title = element_text(size = 14),
         panel.grid = element_blank(),
         plot.margin = unit(c(0.5,0.5,0.5,0.5), units = , "cm"),
         legend.position = "none"))
We can then use ggsave to save this boxplot in our “Final products” folder with the following piece of code:
# Using ggsave to save our boxplot as a png file
ggsave(boxplot, file = "final-pdt/boxplot.png")
After you run the code, the boxplot should now appear in the Git window and in the “final-pdt” folder.
Commit-pull-push your boxplot just as how we’ve done with our cleaned dataset!
We’ve also finished developing our script, so hit Control/Command-S on your keybaord to save it, and it’ll appear in your Git window. Commit-pull-push to push your completed script to your online Github repository.
On your web browser, navigate to your online Github repository, and refresh the page. Check for the following things:
- “soils-script.R” is found in the “code” folder
- “soils-cleaned.csv” is found in the “intermediate-products” folder
- “boxplot.png” is found in the “final-products” folder
- And as before, your “soils-raw.csv” file is in the “data” folder!
Great job! You now know how to (1) download data files into your repo, (2) create a script within your repo, and (2) use code to export relevant objects from our code (csv file and boxplot) to the relevant repo folders (intermediate products and final products). A final few organizational tips below, and you’ll be ready to use Github to organize your own projects!
4. Creating content pages
For the main repository
Earlier, we used our README file to develop a content page for our main repository. Let us now make this better by using Markdown formatting (specifically by using square and normal brackets) to create “hyperlinks” to each folder, and even to the contents of each folder.
In your RStudio “Files” window, navigate to the top of the repository and open the README file. Use square and normal brackets in the way depicted in the following image to create hyperlinks. In the image, I’ve just zoomed into the bit of formatting so that it’s bigger here, so don’t be surprised if you don’t see that larger zoomed in version on your RStudio editor.
Note that when you want to go down into the contents of the folder, we again have to use / slashes. The hyperlinks take reference from the folder in which the README.md file is located. For example, to create a hyperlink to the “soils-script.R” file, since our README is currently in the main repository, we have to first enter the “code” folder by having “code/” first, before then accessing the data file with “soils-script.R”, such that it looks like “code/soils-script.R”.
Make your edits, save the file, and commit-pull-push! Your main README page on the online Github repository (after you refresh the page) will now look something like this:
For each subfolder
If you want to, you can take this a step further and create “content pages” in the README files for each subfolder. Navigate to the folder which contains the README you want to edit - in this case the “code” folder, and open the README file to make your edits. Refer to the image below to see how you should type this up.
Here, note that if we want to make the hyperlink to the “soils-script.R” file, it is slightly different from what we’ve done above. The README file we’re editing is already in the “code” folder, and recall that the hyperlinks take reference from where the README file is located. Therefore, we now don’t need to enter the “code” folder with / slashes, and can just type “soils-script.R”.
Beyond adding the hyperlink to each file in the subfolder, we can also add additional information as bullet points or extra text to the README. For example, in the code folder, if we have lots of scripts, we could specify in the README file what each script contains. Or if we have many different datasets, we could specify what each dataset is, or where it was obtained from in the data folder.
Commit-pull-push, and your README for each folder on Github should look something like this:
Great work! Your repository and all your folders now have their own content pages in the form of README files, and your repository can now be easily navigated.
5. Conclusions and summary
File organisation with Github
Congratulations! You now have a completed repository, with organized folder/file structure, informative README files, and all the data, code, intermediate outputs and final products for this project!
We’ve learnt to create a Github repository that is synced to our local computers, with clear organisation and folder structure. We’ve learnt to use R code to both develop the intermediate outputs and final product, and save them in the correct folders.
Taking all these steps not only helps you better organize all your files in a way that makes sense, but also allows anyone interested in your work to download your repository and be able to run the code. They wouldn’t have problems, for example, in loading the data from the data folder and running the statistical analyses.
Checking out our commit messages!
At the very start of this tutorial, you saw how we can look at the history of a specific R script, and no longer have multiple files such as soils_project_11_sept.R and soils_project_23_sept.R and so on.
Checking out the history extends beyond a specific file - with version control in Github, you can explore the changes you have made with every single commit you’ve made. This could be coding scripts, data, notes, and so much more.
From our main repository, you can see the number of commits that you’ve made for this repo (refer to the following image). If you click that number, it’ll bring you to a list of all the commits you’ve made. Clicking the < > symbol allows us to explore the repository at that specific time when the commit message was made, which might be important if we need to revert any changes.
By clicking the commit message, you will be able to see the changes made for that message. In this case we can see what we added to the code folder README.
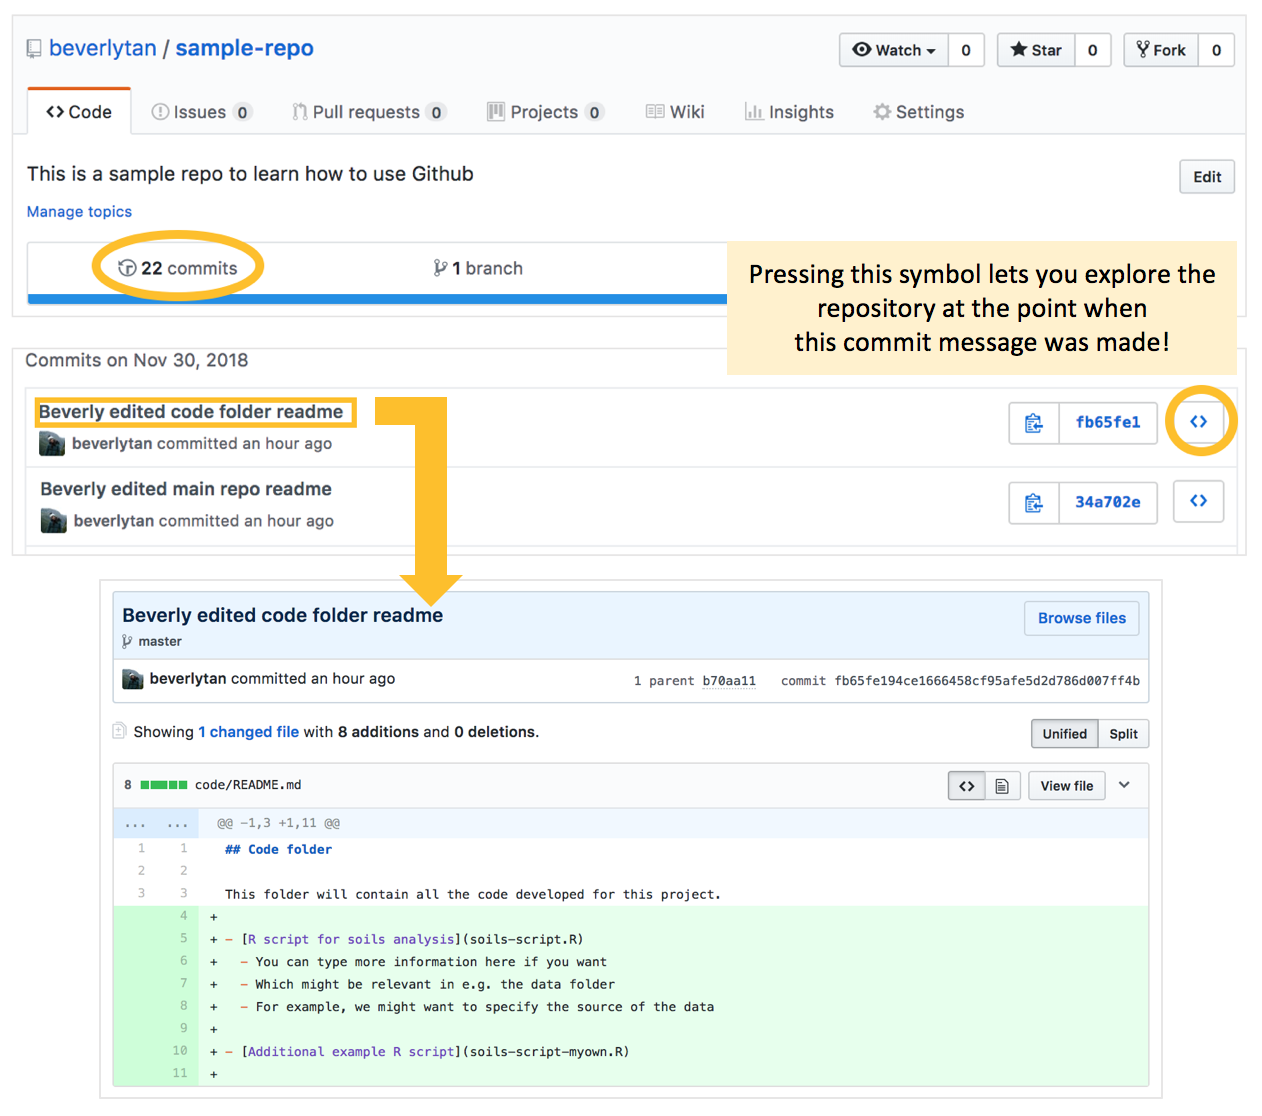
Here we can see exactly how the README.md file in the code folder was changed when this commit was made - we are able to directly compare between the different versions!
We can see how Github is great for version control, and keeping a record of what we’ve done! Informative commit messages that tell you exactly what you are doing at that point are KEY. They allow us to go back to revert our files to previous states, even months after we’ve started work on the project.
Another advantage of creating a repository on Github is that we now have a back-up of our work online. If you were ever to be so unfortunate to lose your work on your local computer, you still have all your work on Github, and can just download the entire repository and all the work you’ve done!
Good job on getting to the end of this tutorial, I hope you’re able to see all the advantages of using Github, and will choose to use it in your own projects! Remember that it is something that you can learn relatively quickly with practice, and will revolutionise how you work!
If you want to cross check the repository you’ve developed against my completed repository, you can check it out here!
The next section contains some additional tips about Github that you might find useful. :-)
6. Other tips, tricks and resources!
Changing existing files
If you’ve made a mistake and want to, for example, delete or rename a file/folder or move it to a different location within the repository, I recommend making any of such changes on your own local computer (e.g. like how you would normally do in your Finder / Windows Explorer window), and then pushing those changes to Github via RStudio. This is because deleting or changing files on the Github online repository can sometimes get a little messy and confusing. It’s easier to just do it locally and then push the changes online.
Setting up other projects
We now have a completed repository for this one project analyzing soils for our Ecological Measurement course. Say we now have a different project on biodiversity occurrence for another university course, Conservation Science - you would then repeat the entire process and create a whole new repository “biodiv-occurrence”, and new corresponding RProject.
However, if let’s say it were all related, for example you want to have a repository for Coding Club work, you could create a main “coding-club” repository. This means you just have a single RProject file titled “coding-club”. Within the main repository, you can then have subfolders for the different tutorials: “data-visualisation” and “data-manipulation”. You then add the relevant tutorial materials into its respective subfolder.
Again, it is important to remember that your one Rproj file coding-club.Rproj will be found in the main repository “coding-club”. If we were working on the R script in the “data-visualisation” folder, note that when we load our data, we have to make sure to tell RStudio that we’re in the “data-visualisation” folder - instead of the main working directory, in the same way specified above to load the data from the “data” folder. Example code for how this could look like as follows:
biodiv <- read_csv("data-visualisation/biodiversity-data.csv")

write.csv(cleaned_biodiv, file = "data-visualisation/biodiv-cleaned.csv")

ggsave(scatterplot, file = "data-visualisation/biodiv-scatterplot.png")
Markdown syntax in .md files!
So far, we’ve only discussed the README files as Markdown files, but you could also add other .md files to your repository / folder. For example, if you had data references and acknowledgements that you wanted to include in the “data” folder, you could create a new Markdown file data-references.md in your data folder.
The following image shows you key Markdown syntax, and what that becomes in a .md file!
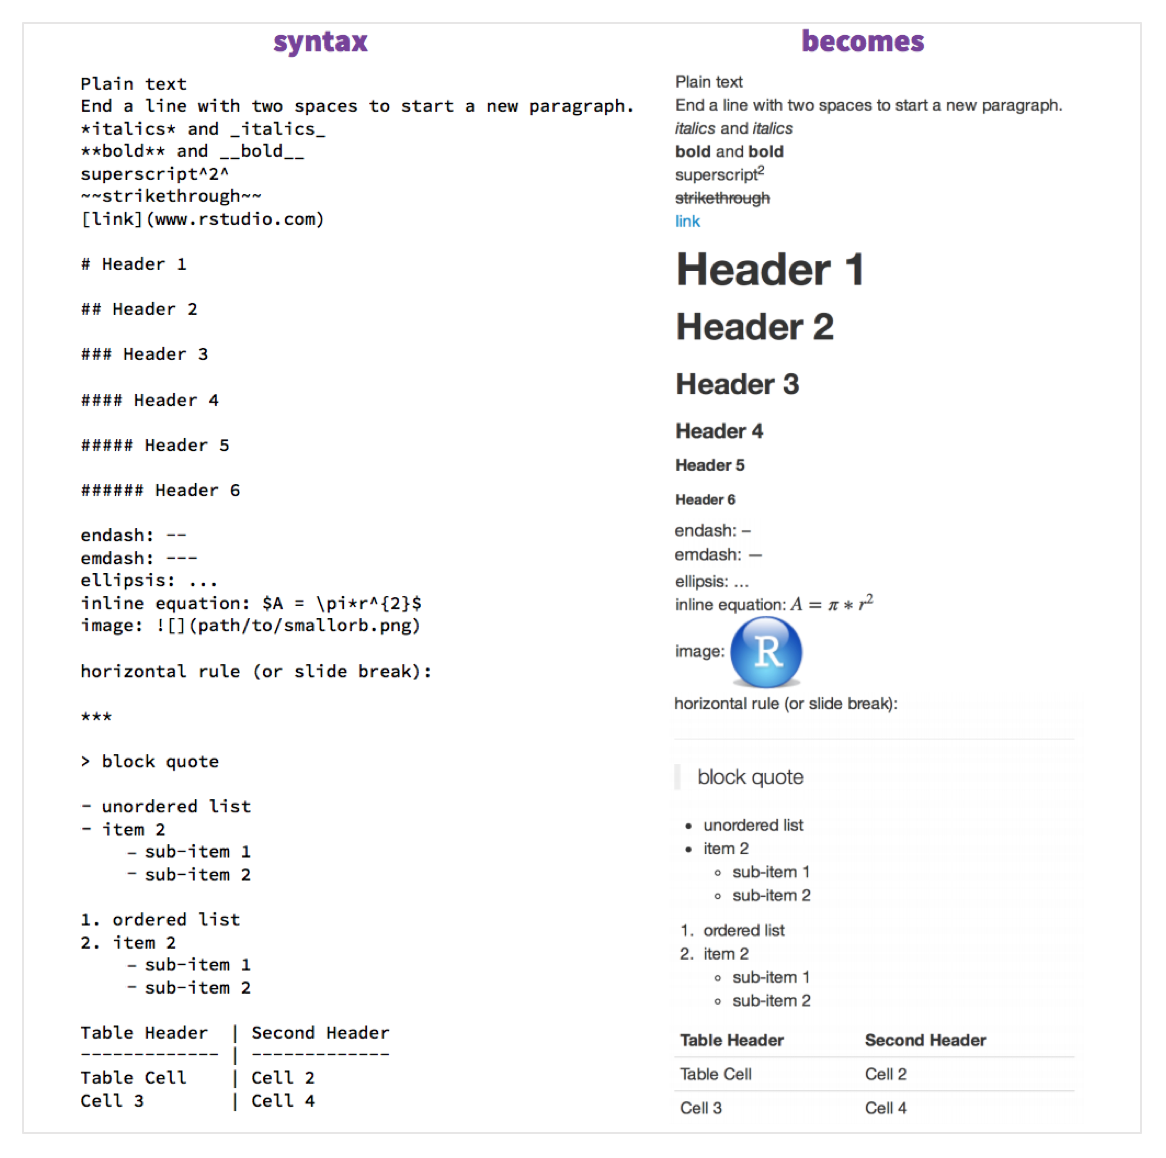
The above image is adapted from RStudio’s RMarkdown Cheatsheet: Note that RMarkdown is different from Markdown, but we won’t go into that here.
Note that you could also use HTML formatting in the .md files if you wanted to. You can find a useful cheatsheet for HTML formatting here if you prefer.
I personally mostly use Markdown syntax, and in some cases switch to HTML: for example when I want to include images in my .md file. This is because HTML allows me a little more customization, for example the height and widths of the image, or if I want it to be aligned to the “right” of the text.
# In Markdown syntax
! [](path/to/image.png)

# In HTML syntax
<img src="path/to/image.png" height = 500, width = 500, align = "right">
Using the Issues tab
There are many features in Github that this tutorial has not explored at all, but one of the most useful is the issues tab! This is generally used as a way to bring up problems to other collaborators in projects that have more than one collaborator.
However, they are still very useful even if you are not using Github collaboratively, and just for your own independent work. They give you a platform to record problems that you might be having, and document how you’re solving the problem - which might be helpful if you ever run into the problem again and want to check how you worked through it.
Here’s an example of me documenting a problem I was facing for an assignment.
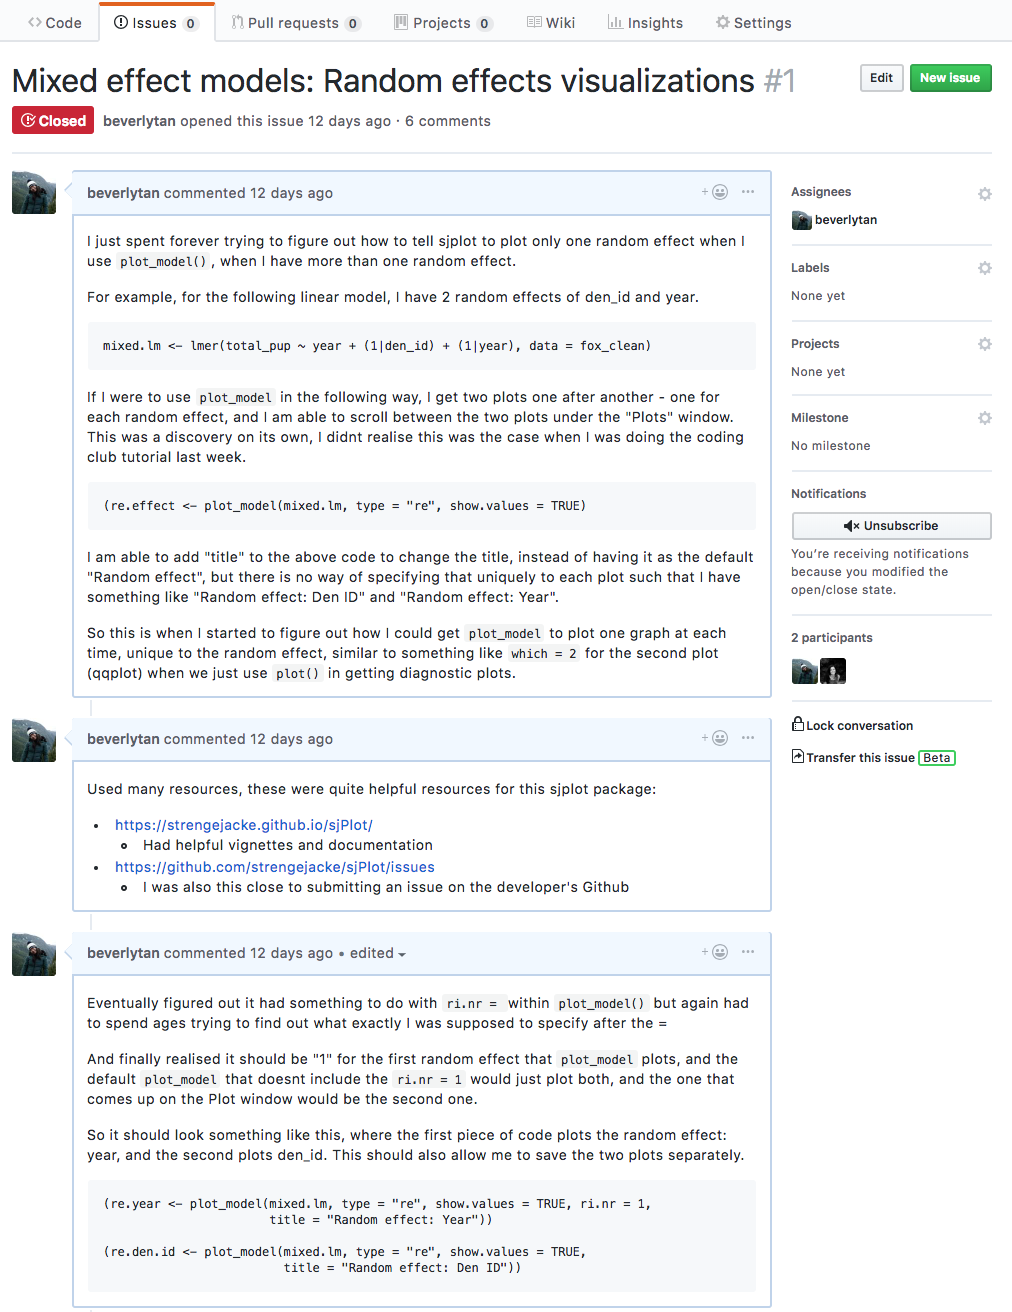
If you want to start using Issues to document your own workflow, you can check them out by navigating to the issues tab, and clicking the green “New issue” button. You can then add your new issue, and even add labels to the issue for your own reference. If you wanted to, you could also assign the issue to other collaborators that have already been added to the repository, and they’d receive an email notification!
Using the Project tab
The projects tab is another useful feature that you could look into, it helps you track your progress on your own work and is a great project management tool.
After creating a new project in the repository, you can then add columns: in the example below I’ve added the columns of “To do, In progress and Done”. You then use the + symbol to add cards to the respective columns. If a note needs more work, convert the card to an issue in the project board, and that gives you other flexibility as well - such as adding labels! This issue will also now appear in the Issues tab that we discussed earlier.
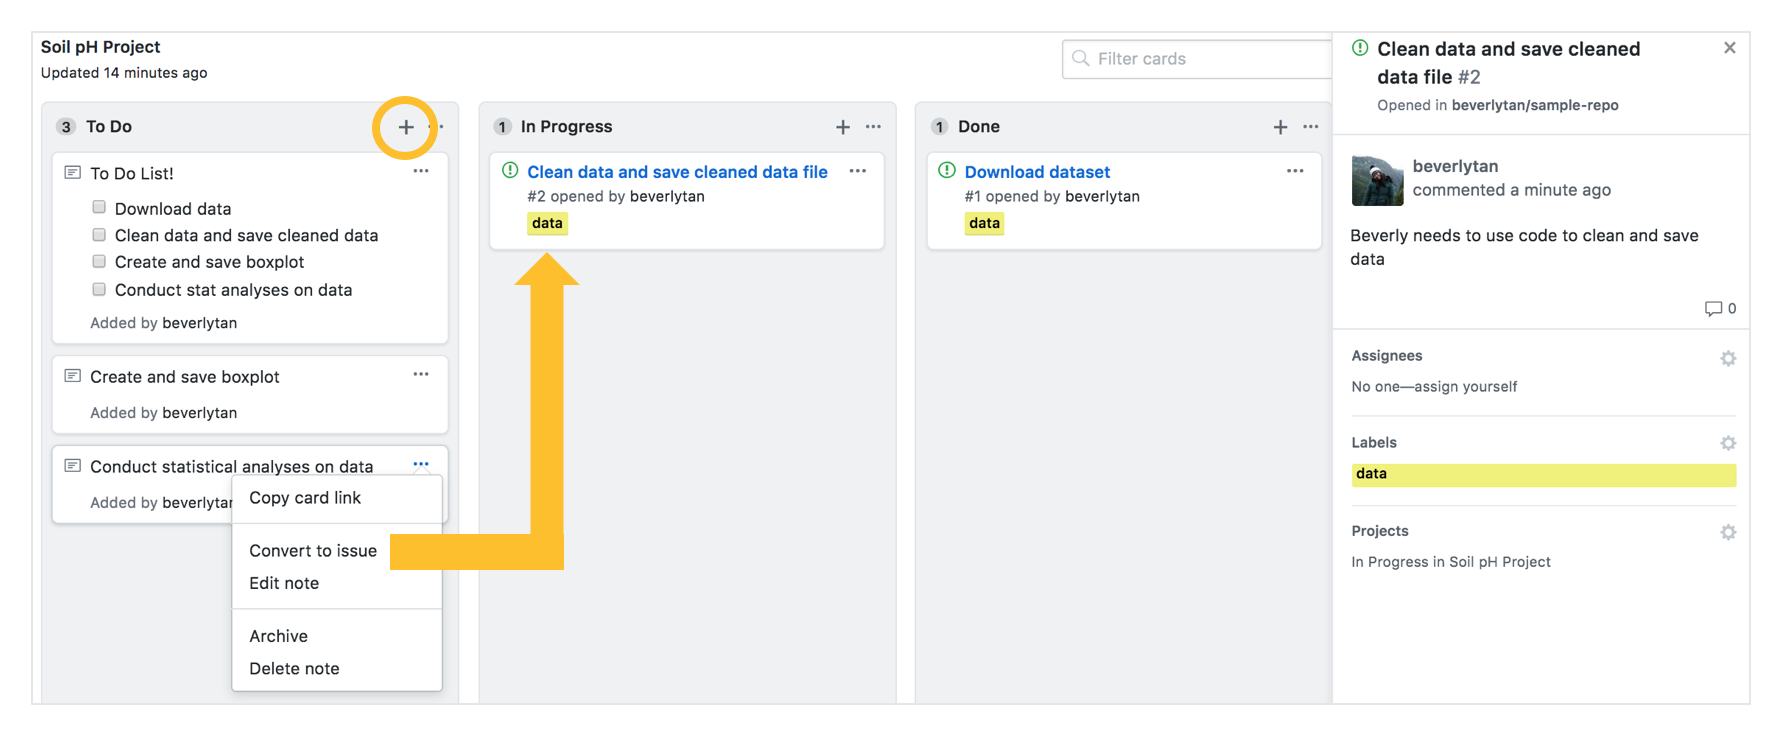
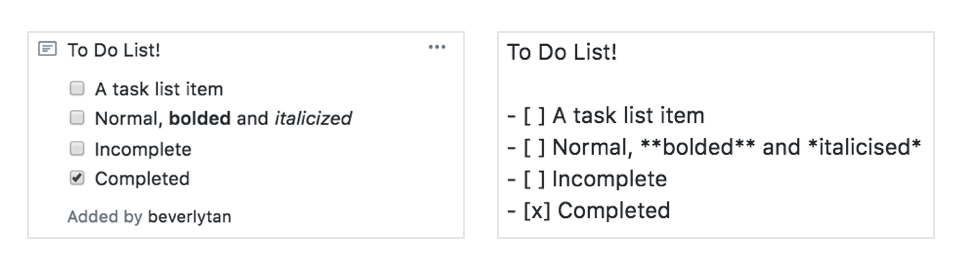
Another handy trick is to create checklists of things that need to be done as a note. Markdown formatting is used in the notes, and we can therefore utilize square brackets and lists to create a checklist! In the bottom figure, the left image is what the card will look like after you’ve added the text and appropriate formatting on the right.
After you’ve created the checklist in the card, you can check or uncheck the boxes, and the “behind-the-scenes” text will automatically update!
Collaborative coding in Github
This tutorial has only been focused on independent use of Github to manage your own projects - but Github is a great platform for collaborative coding! You can add collaborators to the repository, and they can download the online Github repository to their local computers via RStudio.
They can then make edits, commit-pull-push and the changes they make will be reflected on the Github repository. This is why it is so important that you have to PULL from Github - that allows you to take whatever changes that other collaborators have been made (and are now on the Github repo), and keep your files locally up-to-date with your online repository.
The following image, adapted from the following article: Bryan J. 2017. Excuse me, do you have a moment to talk about version control? illustrates the process of how the Github status is maintained as the comprehensive version of the project.
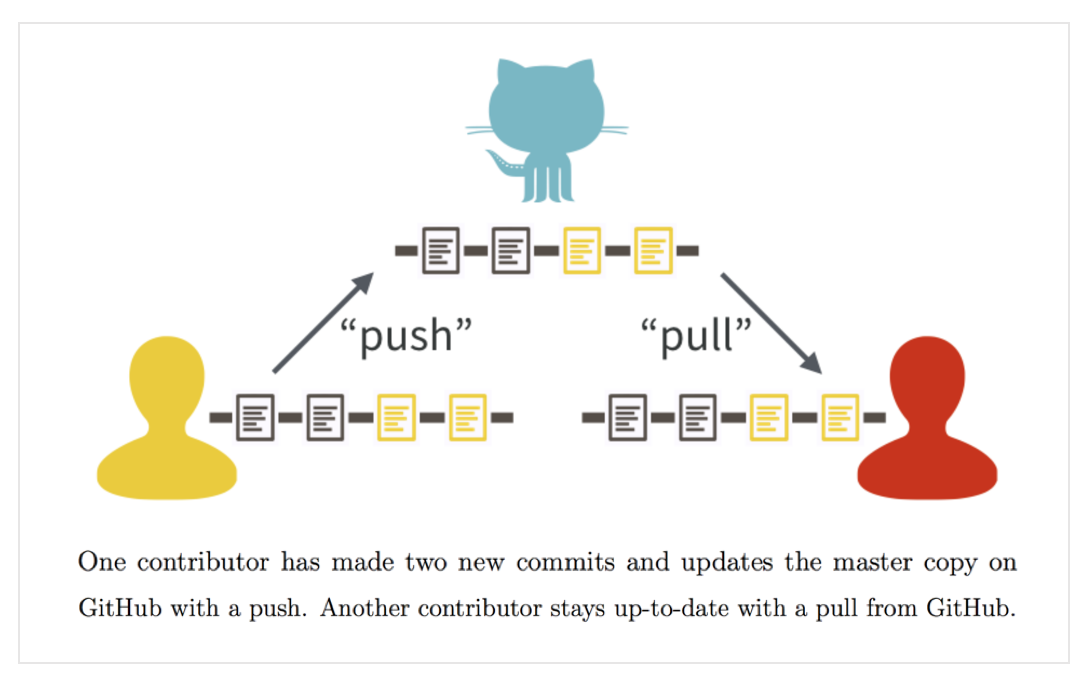
The text below from Chapter 11 of the above article encapsulates how Git and Github are great platforms for collaboration:
Git is a decentralized version control system, meaning each collaborator has their own complete copy of the repo and its history. Everyone can work offline and/or simultaneously. GitHub plays the role of another collaborator, but a very special one. You pull regularly from GitHub, to receive and integrate changes made by your collaborators. You also push regularly to GitHub, to return the favor, and to maintain its status as the comprehensive, authoritative version of the project.
Another way in which collaborative coding can occur is with the use of Forks and Pull Requests on Github, which I won’t be going into here, but this video here does a pretty good job at explaining what they are and how they work.
Syncing and interacting with your repo via the command line
After you become more familiar with the techniques you’ve learnt here today, you can also start to look into utilizing Git via the command line to perform actions on your local repositories - this is a necessary step for more control over Git.
A good introduction to using the command line can be found in this coding club tutorial. The tutorial also provides further resources that you can look at if you are interested in working with the command line.
Happy coding, and I know that Github will improve your workflow as radically as it improved mine - just be sure to practice, practice, practice to get the hang of it! Good luck!
This work is licensed under a MIT License